UI for iOS: Ideas and Techniques
I don’t presume to speak for everyone, but, based on personal experience, I got the impression that for a sufficiently large number of developers, drawing some kind of “feature” with non-standard shape and behavior is an extremely undesirable task. Someone is more in architecture, someone is more about “making business good” with minimal effort, etc. And if you really have to do something out of the ordinary, then google, StackOverflow, experiments, etc. begin, which takes a lot of time, and you get the feeling that it is not worth it at all. Actually, I conceived this small series of articles as some kind of help, the reading of which will remove a number of questions and allow you to quickly evaluate/implement atypical UI components. Using specific examples, I will try to demonstrate how, what and why you can do it.
Example 1: View with custom border and shadow
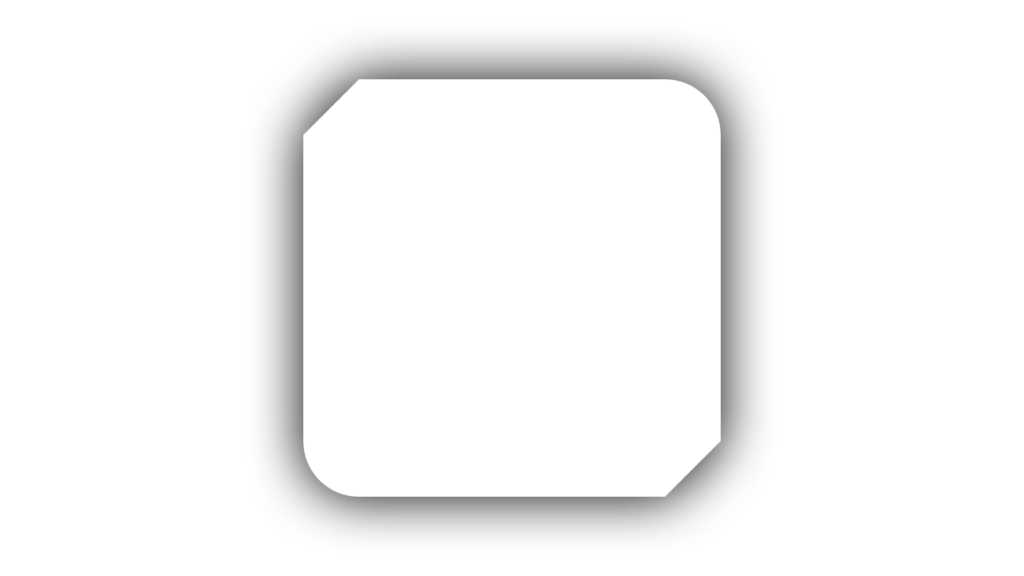
In this case, the idea is simple: add another layer to the layer hierarchy of our view, cut the borders of this layer, and make the shape of the shadow (already at the view itself) exactly the same as the shape of the layer border.
Now a little more detail. CALayer has a mask property. You can read in the documentation that this is the same optional CALayer, and if it is not nil, then its alpha channel is used as a mask for the content of the original layer. That is, if we take a png image with a cat and transparency and somehow put it in a CALayer (let’s call it catLayer), then when assigning layer.mask = catLayer, the content of our original layer will be in the form of a cat, whatever is inside it … Maybe a text cat will work if there is a lot of text inside the layer. In our case, we need a layer mask in the form of an arbitrary shape. Here CAShapeLayer can help – the successor of CALayer, which, roughly speaking, is able to draw an arbitrary shape inside itself by setting path to it. When using a shapeLayer as a mask, anything outside the shape described by shapeLayer.path acts as a filter with alpha = 0.
The form itself can be set using UIBezierPath: for this, the latter has functions
addLine (to :), move (to :), addArc (withCenter: radius: startAngle: endAngle: clockwise), etc.
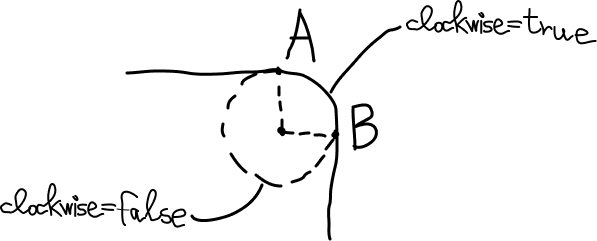
I would like to note a couple of points here. The final path should look like it was “drawn without lifting the pencil from the paper”: start from an arbitrary point on the border and gradually add lines to the common path so that the end of the previous line is the beginning of the next line, and so on. At the end, we return to the starting point. Some people are confused by the addArc function, because it has both startAngle and endAngle and clockwise. Clockwise is just what we need in order to control which of the parts of the circle, given by two corners, we move. In our example, a piece of a circle from -π / 2 to 0 is added in the upper right corner with clockwise equal to true, otherwise we would simply cut out the whole circle from our view:
Why is there an additional layer here at all? Why not set a mask on the original one?
The problem is that the mask works in such a way that it just cuts off everything that it gets, including the shadow of the layer. So if you set a mask on the layer of the original view, then the shadow will simply not be visible.
Finally, to shape the shadow as desired, CALayer has a shadowPath property.
|
1 2 3 4 5 6 7 8 9 10 11 12 13 14 15 16 17 18 19 20 21 22 23 24 25 26 27 28 29 30 31 32 33 34 35 36 37 38 39 40 41 42 43 44 45 46 47 48 49 50 51 52 53 54 55 56 57 58 59 60 61 |
import UIKit final class SimpleCustomBorderAndShadowView: UIView { private let frontLayer = CALayer() private let inset: CGFloat = 40 // MARK: Override override init(frame: CGRect) { super.init(frame: frame) setup() } required init?(coder: NSCoder) { super.init(coder: coder) setup() } override func layoutSubviews() { super.layoutSubviews() frontLayer.frame = bounds let maskAndShadowPath = UIBezierPath() maskAndShadowPath.move(to: CGPoint(x: 0, y: inset)) maskAndShadowPath.addLine(to: CGPoint(x: inset, y: 0)) maskAndShadowPath.addLine(to: CGPoint(x: bounds.width - inset, y: 0)) maskAndShadowPath.addArc(withCenter: CGPoint(x: bounds.width - inset, y: inset), radius: inset, startAngle: -CGFloat.pi / 2, endAngle: 0, clockwise: true) maskAndShadowPath.addLine(to: CGPoint(x: bounds.width, y: bounds.height - inset)) maskAndShadowPath.addLine(to: CGPoint(x: bounds.width - inset, y: bounds.height)) maskAndShadowPath.addLine(to: CGPoint(x: inset, y: bounds.height)) maskAndShadowPath.addArc(withCenter: CGPoint(x: inset, y: bounds.height - inset), radius: inset, startAngle: CGFloat.pi / 2, endAngle: CGFloat.pi, clockwise: true) maskAndShadowPath.close() (frontLayer.mask as? CAShapeLayer)?.frame = bounds (frontLayer.mask as? CAShapeLayer)?.path = maskAndShadowPath.cgPath layer.shadowPath = maskAndShadowPath.cgPath } // MARK: Setup private func setup() { backgroundColor = .clear layer.shadowColor = UIColor.black.cgColor layer.shadowOffset = .zero layer.shadowRadius = 20 layer.shadowOpacity = 1 frontLayer.mask = CAShapeLayer() frontLayer.backgroundColor = UIColor.white.cgColor layer.addSublayer(frontLayer) } } |
Example 2: View with a free-form curve cut

This example is chosen to demonstrate two points: how to cut something inside a layer and how to create a path that would go around a curved line at some distance from it.
In order to cut something inside a layer, you need to understand what rule is used to color the shapes created using the UIBezierPath. It turns out that in order to achieve the effect as in the picture above, you need to add a path that goes around the outer border of the view to the final path for the mask, which is done using UIBezierPath (roundedRect: cornerRadius :), and then add a path corresponding to the cutout in the shape of a curve.
The addQuadCurve (to: controlPoint 🙂 function is used to shape the curve. And if you take UIBezierPath, call addQuadCurve, set its width using lineWidth, and add this to the final path for the mask, then … It won’t work. If you think a little and even remember about this, then everything starts to seem logical: CoreGraphics needs to somehow be told about the boundaries, upon passing through which some counters are counted for a further decision on whether to paint this area or not. To build a path exactly around the curve, CGPath has a copy (strokingWithWidth: lineCap: lineJoin: miterLimit 🙂 function. The CGPath itself, in turn, can be obtained from UIBezierPath by accessing the cgPath property.
Of course, I was cheating a little about a curve of just an arbitrary shape describing the cut-out area, because when self-intersections occur, taking into account the width, problems will arise.
|
1 2 3 4 5 6 7 8 9 10 11 12 13 14 15 16 17 18 19 20 21 22 23 24 25 26 27 28 29 30 31 32 33 34 35 36 37 38 39 40 41 42 43 44 45 46 47 48 49 50 51 52 53 54 |
import UIKit final class ErasedPathView: UIView { private let frontLayer = CAShapeLayer() // MARK: Override override init(frame: CGRect) { super.init(frame: frame) setup() } required init?(coder: NSCoder) { super.init(coder: coder) setup() } override func layoutSubviews() { super.layoutSubviews() frontLayer.frame = bounds let maskAndShadowPath = UIBezierPath(roundedRect: bounds, cornerRadius: 20) let curvePath = UIBezierPath() curvePath.move(to: CGPoint(x: bounds.width / 4, y: bounds.height / 4)) curvePath.addQuadCurve(to: CGPoint(x: bounds.width * 3 / 4, y: bounds.height * 3 / 4), controlPoint: CGPoint(x: bounds.width, y: 0)) let innerPath = UIBezierPath(cgPath: curvePath.cgPath.copy(strokingWithWidth: 70, lineCap: .round, lineJoin: .round, miterLimit: 0)) maskAndShadowPath.append(innerPath) (frontLayer.mask as? CAShapeLayer)?.frame = bounds (frontLayer.mask as? CAShapeLayer)?.path = maskAndShadowPath.cgPath layer.shadowPath = maskAndShadowPath.cgPath } // MARK: Setup private func setup() { backgroundColor = .clear frontLayer.backgroundColor = UIColor.white.cgColor layer.addSublayer(frontLayer) let mask = CAShapeLayer() mask.fillRule = .evenOdd frontLayer.mask = mask layer.shadowColor = UIColor.black.cgColor layer.shadowOffset = .zero layer.shadowRadius = 20 layer.shadowOpacity = 1 } } |
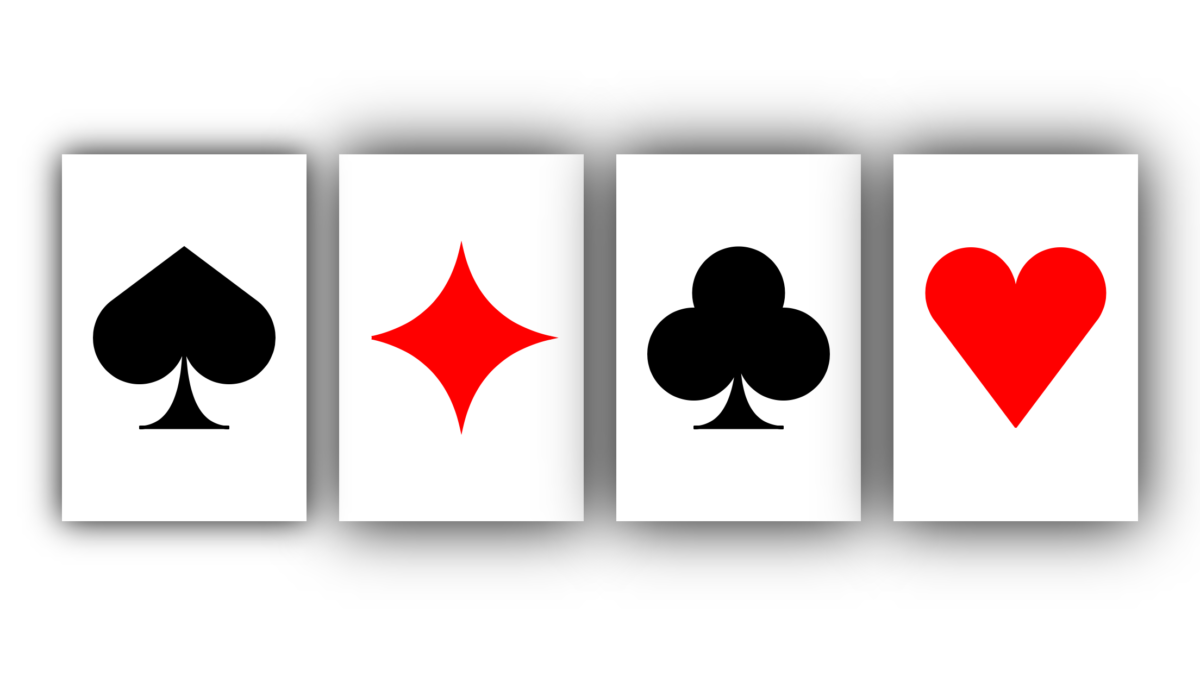
Example 3: Drawing forms inside a view

In order to simply draw whatever you like inside your view, without creating additional layers, you can again use the CAShapeLayer. You need to override the static layerClass property of the original view, returning ShapeLayer.self, and, as in Example 1, set this layer to path.
There is one nuance not mentioned earlier. When constructing a continuous path while drawing an arbitrary shape, you can accidentally jump from the end of the next line to a completely different place. A typical example is adding a new piece of a circle with a non-empty path. In such cases, CoreGraphics simply draws the missing line for you, connecting the last point of the path and the new point of the next added line. In conjunction with the fillRule of the CAShapeLayer, this can be used neatly. For example, in the third picture from the right, this approach greatly simplifies drawing: you do not need to think about where the circles intersect.
Spades
|
1 2 3 4 5 6 7 8 9 10 11 12 13 14 15 16 17 18 19 20 21 22 23 24 25 26 27 28 29 30 31 32 33 34 35 36 37 38 39 40 41 42 43 44 45 46 47 48 49 50 51 52 53 54 55 56 57 58 59 60 61 62 |
import UIKit final class SpadeCardView: UIView { var selfLayer: CAShapeLayer { layer as! CAShapeLayer } private let inset: CGFloat = 20 // MARK: Override static override var layerClass: AnyClass { CAShapeLayer.self } override init(frame: CGRect) { super.init(frame: frame) setup() } required init?(coder: NSCoder) { super.init(coder: coder) setup() } override func layoutSubviews() { super.layoutSubviews() let path = UIBezierPath() let size = bounds.width - 2 * inset let radius = size / 4 let alpha = atan(2 * radius / size) path.move(to: CGPoint(x: bounds.width / 2, y: bounds.height / 2)) path.addArc(withCenter: CGPoint(x: inset + radius, y: bounds.height / 2), radius: radius, startAngle: 0, endAngle: CGFloat.pi + 2 * alpha, clockwise: true) path.addLine(to: CGPoint(x: bounds.width / 2, y: bounds.height / 2 - size / 2)) path.addArc(withCenter: CGPoint(x: bounds.width / 2 + radius, y: bounds.height / 2), radius: radius, startAngle: -2 * alpha, endAngle: CGFloat.pi, clockwise: true) path.addQuadCurve(to: CGPoint(x: bounds.width / 2 + radius, y: bounds.height / 2 + size / 2), controlPoint: CGPoint(x: bounds.width / 2, y: bounds.height / 2 + size / 2)) path.addLine(to: CGPoint(x: bounds.width / 2 - radius, y: bounds.height / 2 + size / 2)) path.addQuadCurve(to: CGPoint(x: bounds.width / 2, y: bounds.height / 2), controlPoint: CGPoint(x: bounds.width / 2, y: bounds.height / 2 + size / 2)) selfLayer.path = path.cgPath } // MARK: Setup private func setup() { selfLayer.fillColor = UIColor.black.cgColor selfLayer.strokeColor = UIColor.black.cgColor selfLayer.lineWidth = 2 layer.shadowColor = UIColor.black.cgColor layer.shadowOffset = .zero layer.shadowRadius = 10 layer.shadowOpacity = 1 } } |
Diamonds
|
1 2 3 4 5 6 7 8 9 10 11 12 13 14 15 16 17 18 19 20 21 22 23 24 25 26 27 28 29 30 31 32 33 34 35 36 37 38 39 40 41 42 43 44 45 46 47 48 49 50 51 52 53 54 |
import UIKit final class DiamondCardView: UIView { var selfLayer: CAShapeLayer { layer as! CAShapeLayer } private let inset: CGFloat = 20 private let adjustment: CGFloat = 10 // MARK: Override static override var layerClass: AnyClass { CAShapeLayer.self } override init(frame: CGRect) { super.init(frame: frame) setup() } required init?(coder: NSCoder) { super.init(coder: coder) setup() } override func layoutSubviews() { super.layoutSubviews() let path = UIBezierPath() let size = bounds.width - 2 * inset path.move(to: CGPoint(x: inset, y: bounds.height / 2)) path.addQuadCurve(to: CGPoint(x: bounds.width / 2, y: bounds.height / 2 - size / 2), controlPoint: CGPoint(x: bounds.width / 2 - adjustment, y: bounds.height / 2 - adjustment)) path.addQuadCurve(to: CGPoint(x: bounds.width - inset, y: bounds.height / 2), controlPoint: CGPoint(x: bounds.width / 2 + adjustment, y: bounds.height / 2 - adjustment)) path.addQuadCurve(to: CGPoint(x: bounds.width / 2, y: bounds.height / 2 + size / 2), controlPoint: CGPoint(x: bounds.width / 2 + adjustment, y: bounds.height / 2 + adjustment)) path.addQuadCurve(to: CGPoint(x: inset, y: bounds.height / 2), controlPoint: CGPoint(x: bounds.width / 2 - adjustment, y: bounds.height / 2 + adjustment)) selfLayer.path = path.cgPath } // MARK: Setup private func setup() { selfLayer.fillColor = UIColor.red.cgColor selfLayer.strokeColor = UIColor.red.cgColor selfLayer.lineWidth = 2 layer.shadowColor = UIColor.black.cgColor layer.shadowOffset = .zero layer.shadowRadius = 20 layer.shadowOpacity = 1 } } |
Clubs
|
1 2 3 4 5 6 7 8 9 10 11 12 13 14 15 16 17 18 19 20 21 22 23 24 25 26 27 28 29 30 31 32 33 34 35 36 37 38 39 40 41 42 43 44 45 46 47 48 49 50 51 52 53 54 55 56 57 58 59 60 61 62 63 64 65 66 67 68 |
import UIKit final class ClubCardView: UIView { var selfLayer: CAShapeLayer { layer as! CAShapeLayer } private let inset: CGFloat = 20 private let adjustment: CGFloat = 10 // MARK: Override static override var layerClass: AnyClass { CAShapeLayer.self } override init(frame: CGRect) { super.init(frame: frame) setup() } required init?(coder: NSCoder) { super.init(coder: coder) setup() } override func layoutSubviews() { super.layoutSubviews() let path = UIBezierPath() let size = bounds.width - 2 * inset let radius = size / 4 path.move(to: CGPoint(x: bounds.width / 2, y: bounds.height / 2)) path.addArc(withCenter: CGPoint(x: bounds.width / 2 - radius, y: bounds.height / 2 + adjustment), radius: radius, startAngle: 0, endAngle: 2 * CGFloat.pi, clockwise: true) path.addArc(withCenter: CGPoint(x: bounds.width / 2, y: bounds.height / 2 - radius), radius: radius, startAngle: CGFloat.pi / 2, endAngle: 5 * CGFloat.pi / 2, clockwise: true) path.addArc(withCenter: CGPoint(x: bounds.width / 2 + radius, y: bounds.height / 2 + adjustment), radius: radius, startAngle: CGFloat.pi, endAngle: 3 * CGFloat.pi, clockwise: true) path.addQuadCurve(to: CGPoint(x: bounds.width / 2 + radius, y: bounds.height / 2 + size / 2), controlPoint: CGPoint(x: bounds.width / 2, y: bounds.height / 2 + size / 2)) path.addLine(to: CGPoint(x: bounds.width / 2 - radius, y: bounds.height / 2 + size / 2)) path.addQuadCurve(to: CGPoint(x: bounds.width / 2, y: bounds.height / 2), controlPoint: CGPoint(x: bounds.width / 2, y: bounds.height / 2 + size / 2)) selfLayer.path = path.cgPath } // MARK: Setup private func setup() { selfLayer.fillColor = UIColor.black.cgColor selfLayer.strokeColor = UIColor.black.cgColor selfLayer.fillRule = .nonZero selfLayer.lineWidth = 2 layer.shadowColor = UIColor.black.cgColor layer.shadowOffset = .zero layer.shadowRadius = 20 layer.shadowOpacity = 1 } } |
Hearts
|
1 2 3 4 5 6 7 8 9 10 11 12 13 14 15 16 17 18 19 20 21 22 23 24 25 26 27 28 29 30 31 32 33 34 35 36 37 38 39 40 41 42 43 44 45 46 47 48 49 50 51 52 53 54 55 56 57 |
import UIKit final class HeartCardView: UIView { var selfLayer: CAShapeLayer { layer as! CAShapeLayer } private let inset: CGFloat = 20 // MARK: Override static override var layerClass: AnyClass { CAShapeLayer.self } override init(frame: CGRect) { super.init(frame: frame) setup() } required init?(coder: NSCoder) { super.init(coder: coder) setup() } override func layoutSubviews() { super.layoutSubviews() let path = UIBezierPath() let size = bounds.width - 2 * inset let radius = size / 4 let alpha = atan(4 * radius / (3 * size)) path.move(to: CGPoint(x: bounds.width / 2, y: bounds.height / 2 + size / 2)) path.addArc(withCenter: CGPoint(x: inset + radius, y: bounds.height / 2 - radius), radius: radius, startAngle: CGFloat.pi - 2 * alpha, endAngle: 0, clockwise: true) path.addArc(withCenter: CGPoint(x: bounds.width / 2 + radius, y: bounds.height / 2 - radius), radius: radius, startAngle: -CGFloat.pi, endAngle: 2 * alpha, clockwise: true) path.addLine(to: CGPoint(x: bounds.width / 2, y: bounds.height / 2 + size / 2)) selfLayer.path = path.cgPath } // MARK: Setup private func setup() { selfLayer.fillColor = UIColor.red.cgColor selfLayer.strokeColor = UIColor.red.cgColor layer.shadowColor = UIColor.black.cgColor layer.shadowOffset = .zero layer.shadowRadius = 20 layer.shadowOpacity = 1 } } |
Things to remember:
- +1 CALayer, mask, CAShapeLayer, shadowPath – for custom border and shadow.
- copy (strokingWithWidth: lineCap: lineJoin: miterLimit 🙂 – for volumetric stroke path.
- CAShapeLayer, path + fillRule – provides interesting features.
