How to download an image from registry without docker
3 days before the new year there was a task to transfer our software to the client through the manager, on a flash drive. Software is a microservice platform with dozens of docker images with many settings and a kilometer-long helm chart. What we had:
- Manager in Moscow (I’m not from there)
- Windows
- There is no direct interaction (and if it were, it didn’t really help)
- No Docker
I thought! I’ll take Golang, write a program, compile for Windows.
… and 5 hours later I realized the haste of my conclusions. At that moment, Nelson’s laughter recalled for the first time. HA HA Which haunted me all the time that I spent studying the issue.
Most of the examples I found require dockerd. Two scripts that do not use dockerd, which were found after an hour of googling. The first option helped me to understand the process of obtaining all image layers and configuration files, but it is impossible to use it with Windows. And the second option indicated that it was not just that various hashes flickered on the screen, specifically this FIXME. We could, of course, stop there, because it works! Transfer to Go is not difficult. But how to verify that the manager’s images turned out to be in the same form as in our registry? No way! Therefore, I just uploaded images to the shared storage, downloaded using the docker save command, and shared the link. And calmed down on this.
On the fourth day of the holidays, pretty tired of them, the idea to download and assemble the docker image correctly overtook me again, and I plunged into the moby code for a couple of hours.
What I had this time:
- Understanding how to get all layers
Taking Python “on hand” and based on this script, I decided to fix it. On the second day, I decided to write a script from scratch. Remembering about my crafts for oauth-authorization, I simply copied part of the code from there, plus the developments already made by me when editing the script. There were no problems with authorization and downloading these data, but questions arose:
- what are the hashes that are displayed when the docker pull command is executed?
- what are the hashes that are used to name directories inside the image tar archive?
- How to build a tar archive so that the check sum matches the original image?
For study, I chose an ubuntu image: 18.04
|
1 |
sha256sum image saved via docker save - 257cab9137419a53359d0ed76f680fe926ed3645238357bdcdb84070a8f26cd0 |
> docker pull ubuntu:18.04 18.04: Pulling from library/ubuntu 2746a4a261c9: Downloading [==============> ] 6.909MB/26.69MB 4c1d20cdee96: Download complete 0d3160e1d0de: Download complete c8e37668deea: Download complete Digest: sha256:250cc6f3f3ffc5cdaa9d8f4946ac79821aafb4d3afc93928f0de9336eba21aa4 Status: Downloaded newer image for ubuntu:18.04 docker.io/library/ubuntu:18.04
Image of tar archive contents
|
1 |
tar tvf ubuntu.tar drwxr-xr-x 0 root root 0 Dec 19 11:21 07adecfcb06a1142a69c3e769cb38f2d4ef9d772726ce1e65bc6dbd4448cccc9/ -rw-r--r-- 0 root root 3 Dec 19 11:21 07adecfcb06a1142a69c3e769cb38f2d4ef9d772726ce1e65bc6dbd4448cccc9/VERSION -rw-r--r-- 0 root root 477 Dec 19 11:21 07adecfcb06a1142a69c3e769cb38f2d4ef9d772726ce1e65bc6dbd4448cccc9/json -rw-r--r-- 0 root root 991232 Dec 19 11:21 07adecfcb06a1142a69c3e769cb38f2d4ef9d772726ce1e65bc6dbd4448cccc9/layer.tar drwxr-xr-x 0 root root 0 Dec 19 11:21 3e1d90747aa9d2a7ec6e9693bdd490dff8528b9aec4a2fac2300824e4ba3a60e/ -rw-r--r-- 0 root root 3 Dec 19 11:21 3e1d90747aa9d2a7ec6e9693bdd490dff8528b9aec4a2fac2300824e4ba3a60e/VERSION -rw-r--r-- 0 root root 477 Dec 19 11:21 3e1d90747aa9d2a7ec6e9693bdd490dff8528b9aec4a2fac2300824e4ba3a60e/json -rw-r--r-- 0 root root 15872 Dec 19 11:21 3e1d90747aa9d2a7ec6e9693bdd490dff8528b9aec4a2fac2300824e4ba3a60e/layer.tar -rw-r--r-- 0 root root 3411 Dec 19 11:21 549b9b86cb8d75a2b668c21c50ee092716d070f129fd1493f95ab7e43767eab8.json drwxr-xr-x 0 root root 0 Dec 19 11:21 b0474230e27ddbba2f46397aac85d4d2fd748064ed9c0ff1e57fec4f063fcf6b/ -rw-r--r-- 0 root root 3 Dec 19 11:21 b0474230e27ddbba2f46397aac85d4d2fd748064ed9c0ff1e57fec4f063fcf6b/VERSION -rw-r--r-- 0 root root 1264 Dec 19 11:21 b0474230e27ddbba2f46397aac85d4d2fd748064ed9c0ff1e57fec4f063fcf6b/json -rw-r--r-- 0 root root 3072 Dec 19 11:21 b0474230e27ddbba2f46397aac85d4d2fd748064ed9c0ff1e57fec4f063fcf6b/layer.tar drwxr-xr-x 0 root root 0 Dec 19 11:21 c8ba25f7db9f70220ac92449b238a0697f9eb580ef4f905225a333fc0a5e8719/ -rw-r--r-- 0 root root 3 Dec 19 11:21 c8ba25f7db9f70220ac92449b238a0697f9eb580ef4f905225a333fc0a5e8719/VERSION -rw-r--r-- 0 root root 401 Dec 19 11:21 c8ba25f7db9f70220ac92449b238a0697f9eb580ef4f905225a333fc0a5e8719/json -rw-r--r-- 0 root root 65571328 Dec 19 11:21 c8ba25f7db9f70220ac92449b238a0697f9eb580ef4f905225a333fc0a5e8719/layer.tar -rw-r--r-- 0 root root 432 Jan 1 1970 manifest.json -rw-r--r-- 0 root root 88 Jan 1 1970 repositories |
Image config
|
1 |
{ ... "rootfs": { "type": "layers", "diff_ids": [ "sha256:2dc9f76fb25b31e0ae9d36adce713364c682ba0d2fa70756486e5cedfaf40012", "sha256:9f3bfcc4a1a8a676da07287a1aa6f2dcc8e869ea6f054c337593481a5bb1345e", "sha256:27dd43ea46a831c39d224e7426794145fba953cd7309feccf4d5ea628072f6a2", "sha256:918efb8f161b4cbfa560e00e8e0efb737d7a8b00bf91bb77976257cd0014b765" ] } ... } |
The first question was sorted out quickly enough, the documentation https://github.com/opencontainers/image-spec/blob/master/config.md helped. The hashes that appear when you run the docker pull command are chainIDs calculated from the diff_ids list of the image-config manifest, where the first chainID is always the first from the diff_ids list, and the subsequent ones are hash sums from the string (chain_id [i-1] + “” + diff_id [i]). Code to build chainID :
|
1 |
def chain_ids(ids: list) -> list: chain = list() chain.append(ids[0]) if len(ids) < 2: return ids nxt = list() nxt.append("sha256:" + hashlib.sha256(f'{ids[0]} {ids[1]}'.encode()).hexdigest()) nxt.extend(ids[2:]) chain.extend(chain_ids(nxt)) return chain |
Adding a prefix with the name of the algorithm, in this case “sha256:”, is mandatory and is included in the requirements of the opencontainers standard, i.e. the string should be of the form “algorithm: hash”.
I spent two evenings on a question about naming a directory. For a long enough time I looked at the source code of docker-daemon and Oh! miracle! I managed to find the generation code. To generate the directory name, you need to calculate the hash from the json layer configuration. Docker has several configuration versions and prior to docker engine 1.9, version v1 configurations were used. And again, the silhouette of Nelson arises. After a short debug I realized that the problem was hiding in the generation of json. In Python, the order of data in a dictionary may differ from the order of data in json generated from this dictionary. The order of the data in json will be different, and accordingly its hash will also be different. I had to go to OrderedDict, pre-register the desired data order in them. This increased the code size by one and a half times.
It seems that everything is corrected, I run the script and somewhere deep inside, the notorious HA-HA pops up! The last hash does not match. Once again I study the code and see, and this is another v1-config containing all the information about the image, which can be seen using the docker inspect command. Add another OrderDict specifically for it, complement the code and … HA HA!
It was already 5 in the morning and my head didn’t really think, so after sleep I returned to viewing the code. Repeatedly looking at the generation code came across a line. How glad I was to see that. Before I saw it, there were thoughts of building my docker with blackjack and data logging. I turn on debug, I run the docker save command and … it’s not at all ridiculous, in docker-desktop for mac os the limit on the line length in the log is 947 characters and the generated config breaks to \ “. After doing all of these steps in Linux, I managed to get the config layer of the first version, on the basis of which I wrote the code, and I managed to get the desired hash of the last layer. The hashes for all the files are the same, the directories are named in the same way as the original image. It’s time to build a tar archive … HAHA!
The file size does not match, read https://github.com/opencontainers/image-spec/blob/master/layer.md and the tar archive format. The default value is 10240 bytes, and the size of the archive I have collected is 9216 bytes larger. At first I thought that it was necessary to reduce the block size to 1024 bytes, which turned out to be incorrect and as a result, the block size of 512 bytes equalized the size of the archives.
|
1 |
tarfile.RECORDSIZE = 512 |
The first line of the newly created archive contains the root folder “/”. This option is not suitable, therefore, I supplement the code by scanning the contents of the folder and add it individually to the archive, having previously sorted it.
Finally, we managed to achieve the same file size, a uniform look of directories, but this is not all. Files and directories, with the exception of manifest.json and respoitories, in the archive must have st_atime attributes, st_mtime equal to st_ctime. For manifest.json and respoitories files, the st_atime, st_mtime, and st_ctime attributes must be dated to the beginning of the 1970-01-01 00:00 era. All dates must be set according to the time zone, respectively. Since I carried out all the work in mac os, I noticed one difference. When saving the image to Linux, the list of files in the archive looked like this:
|
1 |
tar tvf ubuntu.tar drwxr-xr-x 0/0 0 Dec 19 11:21 07adecfcb06a1142a69c3e769cb38f2d4ef9d772726ce1e65bc6dbd4448cccc9/ -rw-r--r-- 0/0 3 Dec 19 11:21 07adecfcb06a1142a69c3e769cb38f2d4ef9d772726ce1e65bc6dbd4448cccc9/VERSION -rw-r--r-- 0/0 477 Dec 19 11:21 07adecfcb06a1142a69c3e769cb38f2d4ef9d772726ce1e65bc6dbd4448cccc9/json -rw-r--r-- 0/0 991232 Dec 19 11:21 07adecfcb06a1142a69c3e769cb38f2d4ef9d772726ce1e65bc6dbd4448cccc9/layer.tar drwxr-xr-x 0/0 0 Dec 19 11:21 3e1d90747aa9d2a7ec6e9693bdd490dff8528b9aec4a2fac2300824e4ba3a60e/ -rw-r--r-- 0/0 3 Dec 19 11:21 3e1d90747aa9d2a7ec6e9693bdd490dff8528b9aec4a2fac2300824e4ba3a60e/VERSION -rw-r--r-- 0/0 477 Dec 19 11:21 3e1d90747aa9d2a7ec6e9693bdd490dff8528b9aec4a2fac2300824e4ba3a60e/json -rw-r--r-- 0/0 15872 Dec 19 11:21 3e1d90747aa9d2a7ec6e9693bdd490dff8528b9aec4a2fac2300824e4ba3a60e/layer.tar -rw-r--r-- 0/0 3411 Dec 19 11:21 549b9b86cb8d75a2b668c21c50ee092716d070f129fd1493f95ab7e43767eab8.json drwxr-xr-x 0/0 0 Dec 19 11:21 b0474230e27ddbba2f46397aac85d4d2fd748064ed9c0ff1e57fec4f063fcf6b/ -rw-r--r-- 0/0 3 Dec 19 11:21 b0474230e27ddbba2f46397aac85d4d2fd748064ed9c0ff1e57fec4f063fcf6b/VERSION -rw-r--r-- 0/0 1264 Dec 19 11:21 b0474230e27ddbba2f46397aac85d4d2fd748064ed9c0ff1e57fec4f063fcf6b/json -rw-r--r-- 0/0 3072 Dec 19 11:21 b0474230e27ddbba2f46397aac85d4d2fd748064ed9c0ff1e57fec4f063fcf6b/layer.tar drwxr-xr-x 0/0 0 Dec 19 11:21 c8ba25f7db9f70220ac92449b238a0697f9eb580ef4f905225a333fc0a5e8719/ -rw-r--r-- 0/0 3 Dec 19 11:21 c8ba25f7db9f70220ac92449b238a0697f9eb580ef4f905225a333fc0a5e8719/VERSION -rw-r--r-- 0/0 401 Dec 19 11:21 c8ba25f7db9f70220ac92449b238a0697f9eb580ef4f905225a333fc0a5e8719/json -rw-r--r-- 0/0 65571328 Dec 19 11:21 c8ba25f7db9f70220ac92449b238a0697f9eb580ef4f905225a333fc0a5e8719/layer.tar -rw-r--r-- 0/0 432 Jan 1 1970 manifest.json -rw-r--r-- 0/0 88 Jan 1 1970 repositories |
Unlike the list at the beginning of the article, on Linux, the archive is saved with the numeric-only flag. There are two variables in the tarinfo object responsible for this, tarinfo.uname and tarinfo.gname. And the second problem with mac os is the lack of a root group, it is fixed using the tarinfo.gid variable in the same tarinfo object. Well, everything seems to be creating an archive
For all files, the hash converges, the names of directories and files are the same, the attributes st_atime, st_mtime and st_ctime converge with the original, the rights to the files are exactly the same. Opening both archives in a hex editor I saw a slight difference:
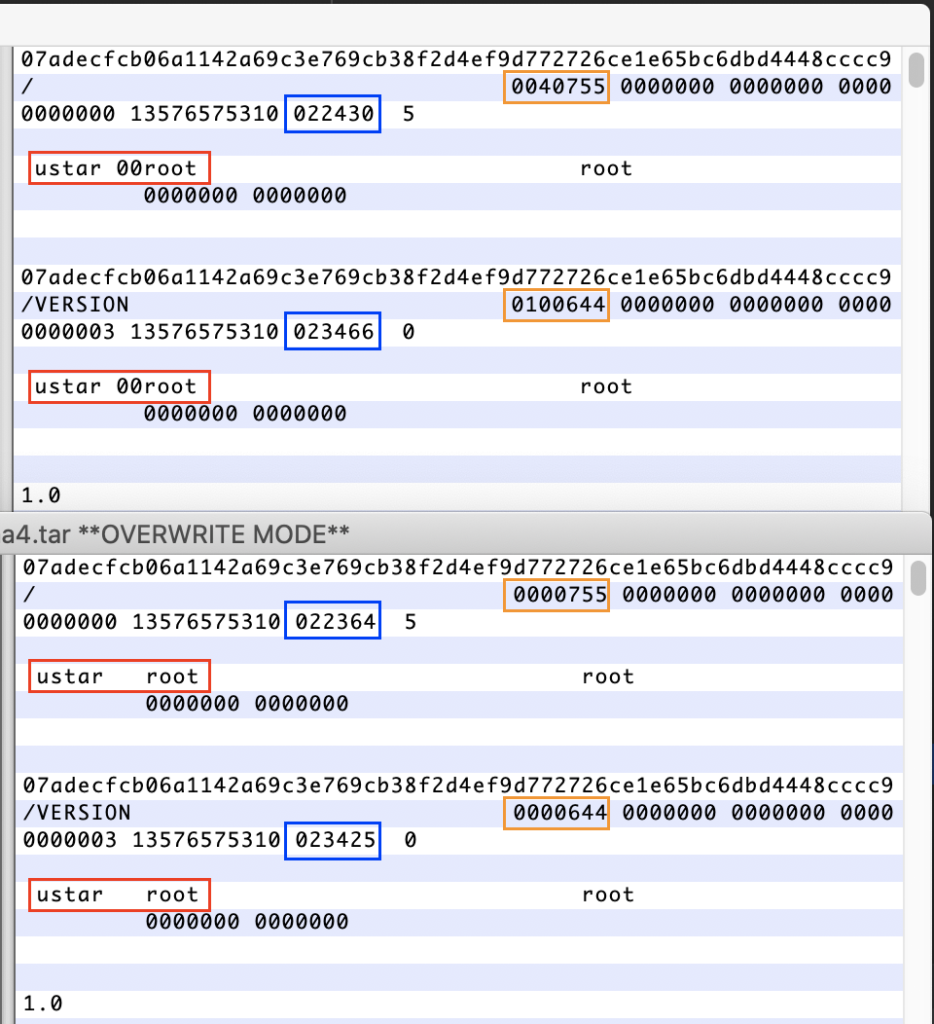
The upper window is the original, the lower archive I have collected.
Understanding the tar format. After the directory name is the value of the rights to the file (orange rectangle). The difference is that information about the object being added to the archive is not added to the directory rights. A value of 40755 indicated in the rights indicates that this is a directory with permissions of 755, and 100644 is a file with permissions of 644. The red rectangle is magic-string and judging by the tarfile code, magic-string ustar \ 000, it is used only in PAX and USTAR formats. The PAX format does not fit at all, it uses a special kind of header. The blue rectangle is a check sum, and it differs due to the use of different formats for writing rights to a file and magic-header.
I switch the archive format to USTAR, but it’s not clear what to do with recording file permissions. Here and here, magic is happening for me, I have never worked with the octal system and I don’t understand why the ampersand is needed here (can anyone share their knowledge in the comments). I had to add several prints to see what data arrives with arguments and what data is used to form the archive block. Taking an integer from the second position of the data block, it was 16877, and leading it to the octal calculus, it turned out that this value is 0o40755, which is exactly what I need. Just overriding the get_info and _create_header functions, deleting & 0o7777 from them (nothing else occurred to me), I managed to collect a tar archive with a sha256 hash that coincided with the original one.
P.S. While writing an article, the image of ubuntu was updated: 18.04 on hub.docker.com. So I had to download the image on Digest. The hash sums no longer match the original due to the fact that Digest was written instead of the tag, otherwise they were identical images.
The second discovery for me was the absence of a repositories file in the archive when saving an image with a missing tag using the docker save command.

