Front End CI / CD: Overview of Tools and Practices for Development Automation
Lets begin with a small educational program. CI / CD – means continuous integration and continuous delivery. Why is this needed?
Most often, the ultimate goal of development is the application. To use it, people must get access to it: either download from the store and install it. If this is a site, put the URL into the address bar and open the page. In order for the mobile application to get to the gate, you need to download it there. In the case of sites, you need to download our HTML / JS / CSS files.
Everything seems to be simple. But downloading files manually is at least inconvenient:
- You need to be at the computer on which these files are.
- When a person uploads files, he may forget to upload something or upload something wrong.
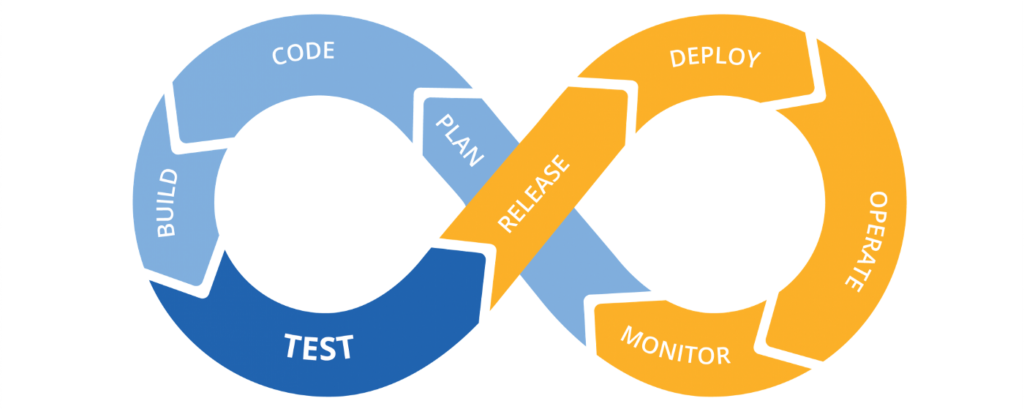
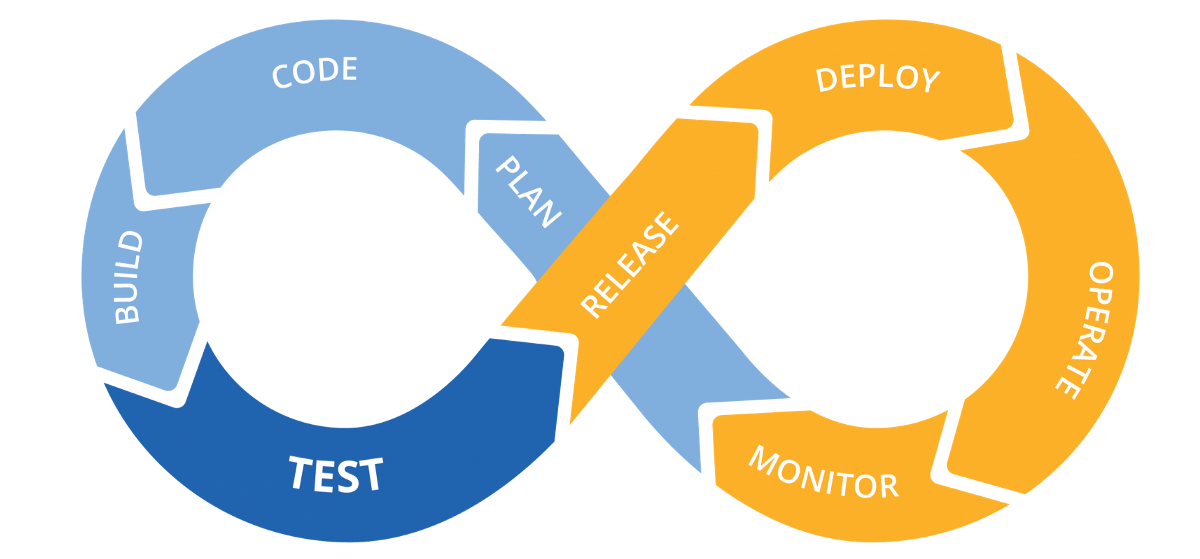
It would be nice to automate the process – this is the deployment, the yellow loop in the picture. In the article I will mention the deployment and release steps.
The blue loop, CI, is what we do after we finalize the new functionality, and before it goes to deploy to become available to users.
What is included in CI
- linters
- tests
- preparation of the production build.
Linter
What for
Linters are static code analyzers that test it without launching. They allow you to reduce the time for code review and save developers from routine tasks: checking the style of the code (spaces, semicolons and line length); search for problems and potential bugs: unused fragments of code, obviously dangerous or over-complicated constructions.
How
- ESLlint is the de facto standard linter for JavaScript.
- TSLint – was the main linter for TypeScript, however, developers refuse to support it in favor of ESLint.
- Prettier is not quite a linter, but rather a formatter that follows a single code style; integrates seamlessly with ESLint and TSLint.
- Stylelint is a linter for CSS and its most popular dialects (SASS, LESS), for which it has plugins.
Tests
What for
Before deploying the application, or even stricter: before putting it into the master, we want to make sure that it is stable. We want to know that the application will not break after launch and that the main use cases work. And we want to do it automatically.
How
- Jest, Mocha, Jasmine – frameworks for organizing and running tests; Jest has been the most popular recently, as it comes out of the box with the Create React App.
- Testing Library, Enzyme – utilities primarily aimed at testing web applications (rendering, click simulation, etc).
- Selenium-webdriver, Cypress – end-to-end testing tools, when the browser will actually start and commands that emulate user actions (clicks, keystrokes, etc.) will be sent there.
Production Assembly Preparation
What and why
A build is a transformation of the source files so that they can be distributed by the server as a website (as a set of HTML / JS / CSS files that the browser understands), published in the package manager (if you are writing a library, framework or utility), used as browser extensions, application on Electron, etc.
During the development process and in production, the application starts and works in different ways. And the characteristics are important to us are different. In the development process, we want the application to be quickly rebuilt and we will see an updated result. It does not matter how much it weighs, because it is distributed from the local machine. In production, it doesn’t matter to us (within reasonable limits, of course) how long the application is going to build, because we collect it once and then just distribute it with the server.
Conditionally production assembly consists of the following processes:
- Permission of imports. Browsers began to understand modularity only recently, and that is still not all. You need to figure out in which order to run the scripts and how to transfer the results of their execution to other scripts.
- Minification and obfuscation. The assembled code weighs less than the source, and is more difficult to analyze. This complicates reverse engineering.
- Stitching environment variables. The same application can work in different environments. The simplest example is on a test server and on production: in this case, you need to build applications two times, once – when the environment is set to the api of the test server, and the second time – production server.
How
Webpack, Parcel, Rollup, SystemJS, gulp, Grunt are the main application builders that solve most of the problems mentioned.
Dotenv, dotenv-cli – npm packages that simplify working with environment variables, especially during development.
Additionally
It is very useful to create a version.json file after the build and before the deployment. This file will contain information about the version of the application, about the build time, a fragment of the hash of the commit from which the application was built.
Store this file so that it is easily accessible next to the web application. For example, at: https://your-site.com/version.json.
Such a simple action will help you and other team members (primarily testers) quickly determine the version of the application that is running in this environment and track deployments.
Npm scripts
All these processes are integration from CI, but so far not very continuous. To automate them, you need to spend time (once) and configure them so that they are launched with a single command on the command line.
Npm scripts are great for this. As a result, all 3 previous processes can be reduced to the launch of three commands, which will look like this:
|
1 2 3 |
npm run lint npm run test npm run build |
Thus, we get a few simple commands that you can run for each new version of the application to catch problems and errors in advance and automatically.
Git hooks
What for
In order not to forget to run linter and tests. Their launch can be automated using Git Hooks, linters and tests will be launched, for example, before each commit.
How
- Husky – allows you to bind npm scripts to Git Hooks inside package.json.
- lint-staged – allows you to run linters only for those files that are prepared for the commit.
What is included in the CD
- versioning and release;
- deployment.
Versioning and Release
What for
Versioning solves a large number of problems: when developing libraries and frameworks, and related to compatibility. We focus on the problems that arise when developing applications for end users. They help to solve:
- Stable revision markers. They simplify the search for the latest stable revision if necessary to roll back the version of the application (if, for example, a critical bug got into production).
- Naming convention. You have the opportunity to discuss fills, without calling them “where we added the profile” or “where we fixed the registration”, and using version numbers – capacious and unambiguous, write more accurate changelogs, more efficiently investigate and reproduce bugs.
How
- Semantic Versioning – a methodology for generating version numbers. One of many, but this one is used for versioning npm packages (it is convenient to combine it with the version in package.json).
- Npm version, yarn version – commands that increase the version of your application. They automatically change the version in package.json, commit with the corresponding message and put a tag in which the name of the new version will be.
Deployment
Deployment is the delivery and uploading of files to the place from where they will be distributed. How the deployment happens depends heavily on how your application is hosted. This can be one of many options, for example: AWS S3 Bucket / AWS CloudFront / another AWS service, of which there are many, Heroku / Dokku, VPS / VPH.
What for
Obviously, if we do not upload our application to the server, from where it will be hosted, people will not be able to use it.
The process needs to be automated: once you spend time writing a script to save a lot of time and nerves, as well as reduce the risk associated with the human factor.
How
Deployment is simply uploading files to another server. The only difference is in the protocol by which it will occur:
- SSH – you can think of it as a push to some remote (in the sense of being far away) repository.
- HTTP is a simple and familiar method for front-end vendors when each file is sent in the body of the corresponding HTTP request.
- FTP is the oldest of these protocols for which you can find a client on Node.js, but you may have to sweat by setting it up.
The file upload operation can be minimized to a single npm script that will run the Node.js. file Most APIs run on Node.js (e.g. AWS).
Total
By analogy with CI, we will get some simple npm-scripts that will allow you to run more complex and responsible processes.
Pipelines
If you translate the word pipeline from English in the context of computer science, one of the translations will be “pipeline.” And this word describes the situation well.
What for
If we take a simplified analogy with a machine, then first we need to assemble an engine running from wheels and axles. Then connect them together so that the engine spins the wheels. Then hang the case on top of it all so that the driver can go in the rain. And at the end to paint so that it is beautiful☺
There are interdependencies and order processes. For example, it makes no sense to deploy the application if the tests fail. A simplified pipeline for our application looks like this: linting and tests – versioning – build – deploy.
This is where the piplines come into play – as a tool that describes and runs the pipeline for CI / CD processes.
How
- Gitlab
- Bitbucket
- GitHub & Azure Pipelines
- Jenkins and many others
Almost everything that I listed on the list is the repository hosting, except for Jenkins’s (which I added for the sake of completeness, so that it is clear that such tools are not necessarily part of the repository hosting).
I’ll give some examples of how this looks in GitLab Pipelines. For examples, I took GitLab for several reasons. I have experience working closely with this service. A free account on GitLab provides a good package related to pipelines, which is enough for you to practice on a pet project. The same applies to the standalone GitLab server. It also gives a general understanding of how pipelines are configured. Personally, it was not difficult, by analogy with GitLab, to understand what Bitbucket Pipelines offered.
GitLab CI / CD
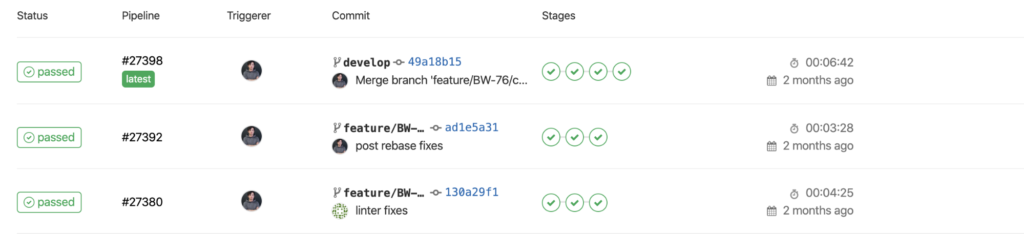
What does it look like. For each commited commit, a pipeline is started. Below you can see a list of pipes that were run for different commits.
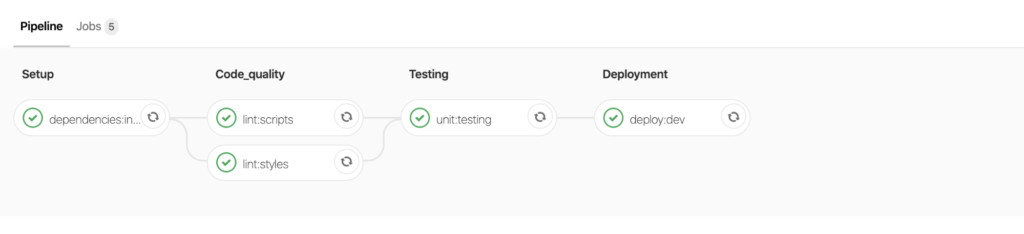
A pipeline consists of steps. Steps, in turn, consist of tasks. Below you can see the expanded structure of the pipeline. The columns Setup, Code_quality and beyond are steps. Each block with a green icon is a separate job.
If one of the jobs crashes, the pipeline stops. At this moment, the benefit of the hosting repository and pipeline bundle is clearly visible: if for the last commit in the merge request the pipeline fell, it would not be possible to contain such a request. This will prevent code from getting into stable branches, which, for example, does not pass the test of linter or tests.

.gitlab-ci.yml
How to set it up. The pipeline is described in the .gitlab-ci.yml file, which should be in the root folder of the repository.
I will focus only on basic examples.
|
1 2 3 4 5 6 7 8 9 10 11 |
image: node:8 variables: REACT_APP_ENV_NAME: $CI_ENVIRONMENT_NAME stages: - setup - code_quality - testing - semver - deployment |
image – indicates in which docker container the pipeline should be launched. Shortly, docker is a technology that provides a predictable runtime. In this case, we want to run in conditional Linux, on which the 8th version of Node.js is installed.
variables – allows you to explicitly define environment variables during the work of the pipeline. In our example, we take a built-in variable that contains the name of the environment for which the pipeline works, and rewrites it into a variable that will be available inside the packaged application. In this case, this was done to integrate with the error tracking system – Sentry.
stages – describes the sequence of tasks. We put dependencies, lint scripts and styles, then test, after which we can deploy. It looks like an array of string values that are used to mark tasks.
Jobs & scripts
|
1 2 3 4 5 6 7 8 9 10 11 12 13 14 15 16 17 18 19 20 21 22 23 24 25 26 27 28 29 30 31 32 33 34 35 36 37 38 39 40 41 42 43 44 45 46 47 48 49 |
dependencies:installation: stage: setup cache: paths: - node_modules/ script: - yarn --prefer-offline --no-progress --non-interactive --frozen-lockfile tags: - web-ci lint:scripts: stage: code_quality cache: paths: - node_modules/ script: - yarn run lint:scripts:check --max-warnings 0 only: changes: - src/**/*.{ts,tsx} tags: - web-ci lint:styles: stage: code_quality cache: paths: - node_modules/ script: - yarn run lint:styles:check only: changes: - src/**/*.{css,scss} tags: - web-ci unit:testing: stage: testing cache: paths: - node_modules/ only: changes: - src/**/*.{ts,tsx} script: - yarn test tags: - web-ci |
jobs – further from the root are the names of tasks and then deep into – their description. The key parameters of the job are stages, the binding of a particular job to the stage. This determines after which work it will be performed.
script – a set of commands that will be executed during the work of the job. For dependencies installation, we see that this is just one command – yarn – with arguments that say do not download too much if it is in the cache.
In a similar way, it works with script and style lint. Please note that both scripts and styles are tied to one stage. This means that if possible they will go in parallel.
only and exlude allow you to determine when a job should work, and when not. For example, we see that script lining occurs only with changes within the framework of .ts and .tsx files, CSS and SCSS styles.
In the same way, you can make deployment deployments available only to the master branch.
Versioning
Versioning is one of the confusing tasks when building a pipeline. The pipeline runs on one of the commits, and versioning itself provokes the creation of a new commit, in which the version of package.json will be changed and a new tag will be affixed. We will have to push to the repository from the pipeline and, in this way, one pipeline will provoke another pipeline.
Cod
|
1 2 3 4 5 6 7 8 9 10 11 12 13 14 15 16 17 18 19 20 21 22 23 24 25 26 27 28 29 30 31 32 |
.semver_script: &semver_script stage: semver when: manual only: - master except: refs: - /^v\d+\.\d+.\d+$/ tags: - web-ci script: - mkdir -p ~/.ssh && chmod 700 ~/.ssh - ssh-keyscan $CI_SERVER_HOST >> ~/.ssh/known_hosts && chmod 644 ~/.ssh/known_hosts - eval $(ssh-agent -s) - ssh-add <(echo "$SSH_PRIVATE_KEY") - git remote set-url --push origin git@$CI_SERVER_HOST:$CI_PROJECT_PATH.git - git config --local --replace-all user.email "[email protected]" - git config --local --replace-all user.name "Gitlab CI" - git checkout $CI_COMMIT_REF_NAME - git reset --hard origin/$CI_COMMIT_REF_NAME - npm version $SEMVER_LEVEL - git push -u origin $CI_COMMIT_REF_NAME --tags semver:minor: <<: *semver_script variables: SEMVER_LEVEL: minor semver:patch: <<: *semver_script variables: SEMVER_LEVEL: patch |
This fragment is already more complex. Two similar job descriptions are described here: for incrementing the minor and patch versions, respectively. The script describes operations that will allow pushing from the pipeline to your own repository:
- Adding a private SSH key that is stored in environment variables and which has push access to the repository.
- Adding a repository host to the list of known hosts.
- The configuration of a git user with a name and email, which is also necessary in order to be able to commit and push.
In order not to copy this fragment for minor and patch versions, a feature of YAML files called YAML anchor is used here. Thanks to such features, YAML files become the best format for describing configurations.
Deployment and environment variables
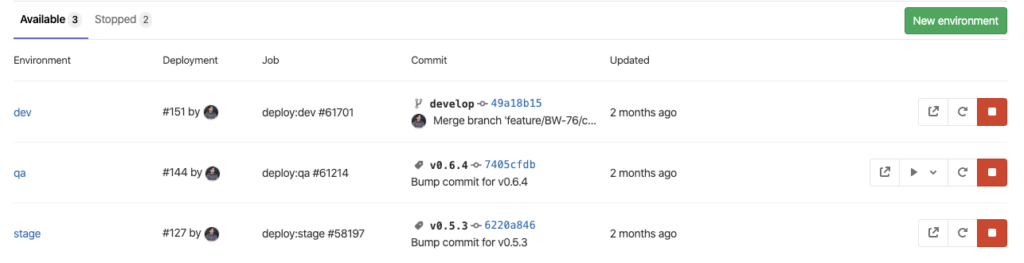
Here you can see the Gitlab web interface for creating and editing deployment environments. Once they are created here, they can be used in .gitlab-ci.yaml.
Below is a fragment of the deployment configuration using the example of uploading the build results to AWS S3 Bucket. It is also uses the YAML anchor to prevent code duplication.
Cod
|
1 2 3 4 5 6 7 8 9 10 11 12 13 14 15 16 17 18 19 20 21 22 23 24 25 26 27 28 29 30 31 32 33 34 35 36 37 |
.deploy_script: &deploy_script cache: paths: - node_modules/ stage: deployment script: - yarn run build - yarn run deploy tags: - web-ci deploy:dev: <<: *deploy_script variables: AWS_S3_HOST_BUCKET_NAME: $AWS_S3_HOST_BUCKET_NAME__DEV REACT_APP_API_BASE: $REACT_APP_API_BASE__DEV environment: name: dev url: http://$AWS_S3_HOST_BUCKET_NAME.s3-website.us-east-1.amazonaws.com/ only: - develop deploy:qa: <<: *deploy_script when: manual variables: AWS_S3_HOST_BUCKET_NAME: $AWS_S3_HOST_BUCKET_NAME__QA REACT_APP_API_BASE: $REACT_APP_API_BASE__QA environment: name: qa url: http://$AWS_S3_HOST_BUCKET_NAME.s3-website.us-east-1.amazonaws.com/ only: refs: - /^v\d+\.\d+.\d+$/ changes: - package.json |
Notice how environment variables are used. The yarn run build and yarn run deploy commands use variable names without postfixes, which are defined at the level of a particular job from the values found in variables with postfixes.
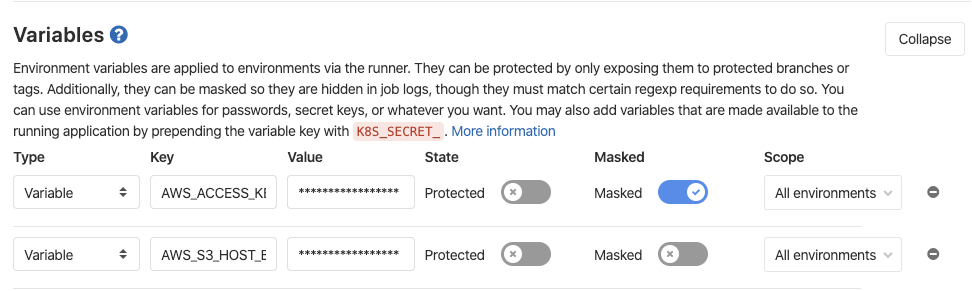
Here you can see a web interface in which environment variables can be described. They will be available inside the pipeline when it starts. Here you can determine the api backend addresses, api keys for the services you use: for example, Google API key, SSH keys for versioning and other data that are not safe to commit.
Conclusion
Even when considering CI / CD in the framework of the specifics of the frontend, many details and nuances are revealed. The pipline configuration file from my example is working, you can use it for your projects by substituting the corresponding npm or yarn scripts. I hope this article will be the starting point for discussion and immersion in the topic.