Writing a Basic GitHub Action in TypeScript
This article is primarily intended for beginners, those who have never used GitHub Actions but would like to get started quickly. Nevertheless, even if you already have a similar experience, but you, for example, have not used ncc, then perhaps you will find something useful in it.
A quick introduction to GitHub Actions
At the heart of GitHub Actions is the concept of a workflow that is triggered by specific triggers. One repository can contain either one workflow or several separate ones that are triggered under different conditions.
To add a workflow, you need to create one or more yml files in the repository in the .github/workflows folder. The simplest file might look like this:
|
1 2 3 4 5 6 7 8 9 10 11 12 13 14 |
name: Hello on: [push] jobs: Hello: runs-on: ubuntu-latest steps: - name: Checkout uses: actions/checkout@v2 - name: Hello run: echo "Hello, GitHub Actions!" |
In this case, we indicate that we want to start a workflow when pushing to a branch. You can also do this on a schedule, manually through the interface, or by some other trigger, for example, when publishing a release or creating a ticket.
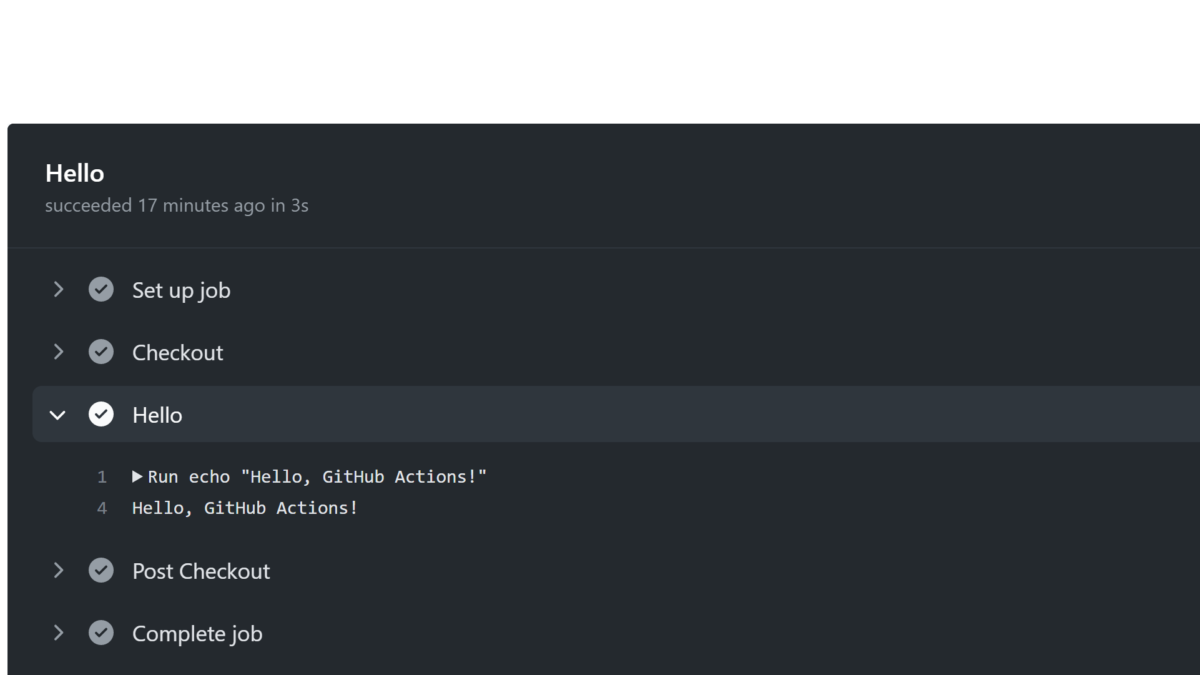
We can find the workflow itself on the Actions tab in the GitHub interface and see detailed information on it:
- Anywhere in the repository. For example, you can place multiple actions in the root of the repository, each in its own subfolder. This method works well if you want to create something like a personal library with a set of actions that you intend to use from different projects. In this case, you need to refer to such actions by the name of the repository, path and branch or tag:
|
1 2 |
steps: - uses: {owner}/{repo}/{path}@{ref} |
- At the root of the repository. This method allows you to place only one activity in one repository, and is usually used if you want to publish it to the Marketplace later. In this case, you need to refer to such actions by the name of the repository and the branch or tag:
|
1 2 |
steps: - uses: {owner}/{repo}@{ref} |
How to create a TypeScript action
As an example, let’s create a very simple action that simply displays the Hello, GitHub Actions! message. To develop an action, we need an installed version of Node.js.
Create a .github/actions folder in the repository. In it, we will create a subfolder hello, in which we will further create all the files related to our action. We only need to create four files.
Create action.yml file:
|
1 2 3 4 5 6 7 8 9 10 11 |
name: Hello description: Greet someone runs: using: node12 main: dist/index.js inputs: Name: description: Who to greet required: true |
This file contains the metadata of our action. By its presence, GitHub understands that the folder contains not a random set of files, but some action that can be downloaded and performed.
We also indicate that this is a JavaScript action, not a docker container, and we indicate the entry point: the dist/index.js file. We do not have this file yet, but it will be automatically created a little later.
In addition, we can specify in this file a set of input and output parameters. In this case, we pass the greeting name as a parameter.
(More information on the capabilities of the metadata file can be found in the documentation)
Create a package.json file:
|
1 2 3 4 5 6 7 8 9 10 11 12 13 14 15 |
{ "private": true, "scripts": { "build": "npx ncc build ./src/main.ts" }, "dependencies": { "@actions/core": "^1.2.7", "@actions/exec": "^1.0.4", "@actions/github": "^4.0.0", "@actions/glob": "^0.1.2", "@types/node": "^14.14.41", "@vercel/ncc": "^0.28.3", "typescript": "^4.2.4" } } |
This is the standard file for Node.js. In order not to indicate useless attributes such as author, license, etc. you can simply indicate that the package is private.
In the scripts, we specify one single build script that runs the ncc utility. This utility takes the src/main.ts file as input and creates the dist/index.js file, which is the entry point for our action. I will come back to this utility a bit later.
As dependencies, we specify typescript and @types/node for TypeScript to work. The @vercel/ncc dependency is needed for ncc to work.
The @actions/* dependencies are optional and are part of the GitHub Actions Toolkit – a set of packages for developing actions:
You will most likely need the @actions/core dependency. It contains basic functionality for outputting logs, reading action parameters, etc.
The @actions/exec dependency is needed to start other processes like dotnet
The @actions/github dependency is needed to interact with the GitHub API
The @actions/glob dependency is needed to search for files by mask
It is also worth noting that formally since we will be compiling our action into a single dist/index.js file via ncc, all our dependencies will be design-time dependencies, i.e. it is more correct to place them not in dependencies, but in devDependencies. But by and large, there is no difference, these dependencies will not be used at all at runtime.
Create tsconfig.json file:
|
1 2 3 4 5 6 7 8 |
{ "compilerOptions": { "target": "ES6", "module": "CommonJS", "moduleResolution": "Node", "strict": true } } |
Everything is quite simple here. This is a minimal file that everything works well with, including normal syntax highlighting and IntelliSense in Visual Studio Code.
Create src/main.ts file:
|
1 2 3 4 5 6 7 8 9 10 11 12 13 14 |
import * as core from '@actions/core' async function main() { try { const name = core.getInput('Name'); core.info(`Hello, ${name}`); } catch (error) { core.setFailed(error.message) } } main(); |
As an entry point, we use a synchronous or asynchronous function main, which we call in the same file. (The function name can also be anything).
The body of the function must be wrapped in a try-catch block so that the build-in GitHub will abort in the event of any errors. Without this, it will always be considered successful.
In this particular case, we also use the @actions/core package to read the parameters and output the message to the log.
Putting together action with ncc
After all the files are created, the first thing we need to do is restore all packages from npm. To do this, we need to go to the action folder (not the root of the repository) and run the command:
|
1 |
npm install |
And then a nuance arises. If you read the official documentation, in order for GitHub to download and execute the action correctly, all scripts, including dependencies, must be in the same repository. This means that we are essentially asked to commit the node_modules folder to the repository, which, in my opinion, is not a very nice solution.
Alternatively, you can use the @vercel/ncc package, which allows you to collect js or ts files into one single js file, which can already be committed to the repository.
Since we have already specified the build script in the package.json file, we only need to run the command:
|
1 |
npm run build |
As a result, we will get the dist/index.js file, which will need to be committed to the repository along with the rest of the files. The node_modules folder can be safely sent to .gitignore.
Using the action
To test the action, let’s create a workflow file in the .github/workflows folder. For a change, we will make it so that it is launched not by push, but manually from the interface:
|
1 2 3 4 5 6 7 8 9 10 11 12 13 14 15 16 17 18 19 20 21 22 |
name: Hello on: workflow_dispatch: inputs: Name: description: Who to greet required: true default: 'GitHub Actions' jobs: Hello: runs-on: ubuntu-latest steps: - name: Checkout uses: actions/checkout@v2 - name: Hello uses: ./.github/actions/hello with: Name: ${{ github.event.inputs.Name }} |
Here the workflow_dispatch settings describe the form in the GitHub interface into which the user can enter data. There we will have one single field for entering a name for the greeting.
The data entered into the form through the event is passed to the action, which we launch in the workflow through the github.event.inputs.Name parameter.
In addition, since the activity is in the same repository as the workflow, we definitely need to checkout so that all scripts are available in the working folder.
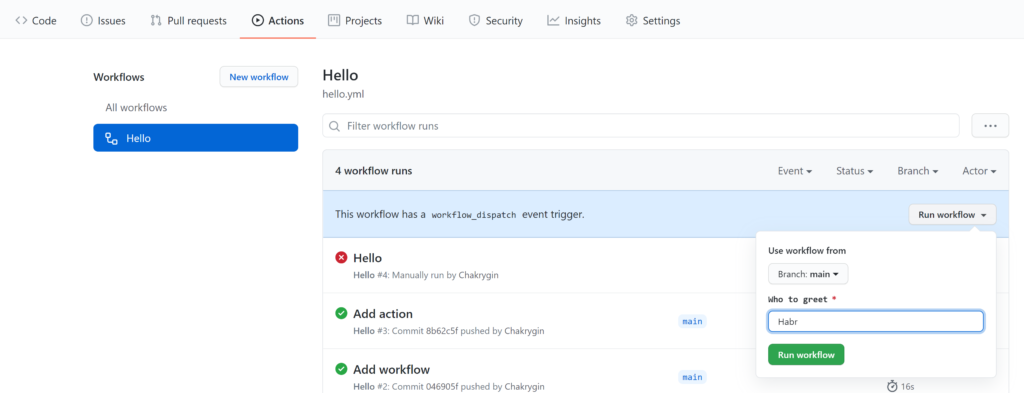
After we launch our workflow, we can go to the GitHub interface, on the Actions page, select our workflow and start its execution, specifying the parameters:
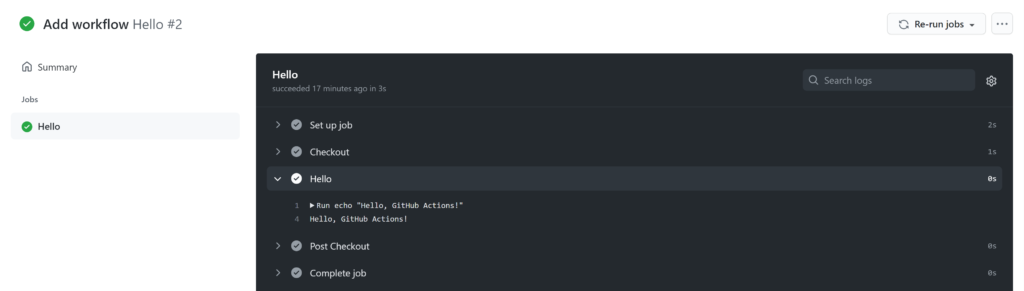
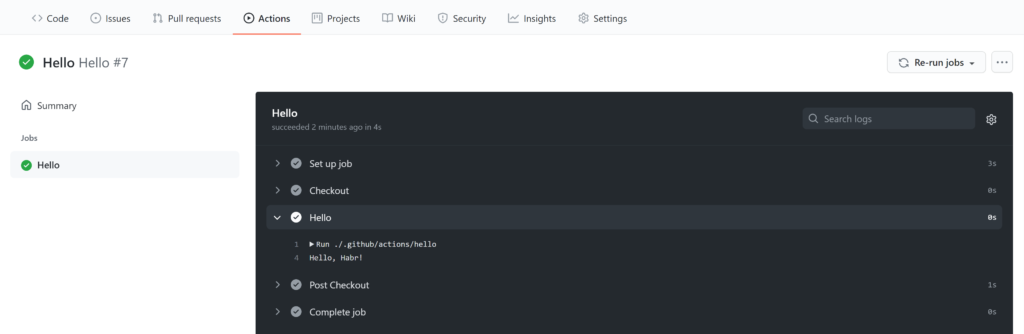
After we start the workflow, we can go into it and see what happened:
Configuring GitHooks for Automatic Builds
In general, everything is fine, we created an action using TypeScript and launched it from the workflow. This could have been done already, but one small detail remained.
Every time we change the action code, we need to remember to call the command:
|
1 |
npm run build |
From experience, such a manual launch will constantly lead to the situation “I sort of changed the code and pushed it to the server, but nothing has changed for me. Oh, damn it, I forgot to rebuild the files …”.
There are several ways to solve this problem. You don’t have to worry and really start the assembly with your hands every time. In some projects, people approach this thoroughly and do a special workflow through the same GitHub Actions, which for each commit tries to rebuild the action and commit changes.
But you can just add a git hook that automatically rebuilds all actions in the repository for each commit. To do this, you need to create a .githooks folder in the repository, and in it a pre-commit file of the following form:
|
1 2 3 4 5 6 7 8 9 10 11 12 13 |
#!/bin/sh for action in $(find ".github/actions" -name "action.yml"); do action_path=$(dirname $action) action_name=$(basename $action_path) echo "Building \"$action_name\" action..." pushd "$action_path" >/dev/null npm run build git add "dist/index.js" popd >/dev/null echo done |
Here we find all the action.yml files in the .github/actions folder and for all found files we run the build from their folder. Now we will not need to think about the explicit reassembly of our actions, it will be done automatically.
In order for the hooks from the .githooks folder to run, we need to change the configuration for the current repository:
|
1 |
git config core.hooksPath .githooks |
Or you can do it globally:
|
1 |
git config --global core.hooksPath .githooks |
Conclusion
This article has gathered the basic information you need to quickly take the first step to GitHub Actions and start writing your own automation scripts in TypeScript.
- In the
.github/actionssubfolder. This method is usually used when you want to use these actions from the same repository. In this case, you must refer to them along the path without specifying a branch or tag:
|
1 2 |
steps: - uses: ./.github/actions/{path} |
- Anywhere in the repository. For example, you can place multiple actions in the root of the repository, each in its own subfolder. This method works well if you want to create something like a personal library with a set of actions that you intend to use from different projects. In this case, you need to refer to such actions by the name of the repository, path and branch or tag:
- At the root of the repository. This method allows you to place only one activity in one repository, and is usually used if you want to publish it to the Marketplace later. In this case, you need to refer to such actions by the name of the repository and the branch or tag:
How to create a TypeScript action
As an example, let’s create a very simple action that simply displays the Hello, GitHub Actions! message. To develop an action, we need an installed version of Node.js.
Create a .github/actions folder in the repository. In it, we will create a subfolder hello, in which we will further create all the files related to our action. We only need to create four files.
Create action.yml file:
[crayon-6a5e2d42e44b7164981457/]This file contains the metadata of our action. By its presence, GitHub understands that the folder contains not a random set of files, but some action that can be downloaded and performed.
We also indicate that this is a JavaScript action, not a docker container, and we indicate the entry point: the dist/index.js file. We do not have this file yet, but it will be automatically created a little later.
In addition, we can specify in this file a set of input and output parameters. In this case, we pass the greeting name as a parameter.
(More information on the capabilities of the metadata file can be found in the documentation)
Create a package.json file:
[crayon-6a5e2d42e44ba615208565/]This is the standard file for Node.js. In order not to indicate useless attributes such as author, license, etc. you can simply indicate that the package is private.
In the scripts, we specify one single build script that runs the ncc utility. This utility takes the src/main.ts file as input and creates the dist/index.js file, which is the entry point for our action. I will come back to this utility a bit later.
As dependencies, we specify typescript and @types/node for TypeScript to work. The @vercel/ncc dependency is needed for ncc to work.
The @actions/* dependencies are optional and are part of the GitHub Actions Toolkit – a set of packages for developing actions:
You will most likely need the @actions/core dependency. It contains basic functionality for outputting logs, reading action parameters, etc.
The @actions/exec dependency is needed to start other processes like dotnet
The @actions/github dependency is needed to interact with the GitHub API
The @actions/glob dependency is needed to search for files by mask
It is also worth noting that formally since we will be compiling our action into a single dist/index.js file via ncc, all our dependencies will be design-time dependencies, i.e. it is more correct to place them not in dependencies, but in devDependencies. But by and large, there is no difference, these dependencies will not be used at all at runtime.
Create tsconfig.json file:
[crayon-6a5e2d42e44bd320721486/]Everything is quite simple here. This is a minimal file that everything works well with, including normal syntax highlighting and IntelliSense in Visual Studio Code.
Create src/main.ts file:
[crayon-6a5e2d42e44e2495627044/]As an entry point, we use a synchronous or asynchronous function main, which we call in the same file. (The function name can also be anything).
The body of the function must be wrapped in a try-catch block so that the build-in GitHub will abort in the event of any errors. Without this, it will always be considered successful.
In this particular case, we also use the @actions/core package to read the parameters and output the message to the log.
Putting together action with ncc
After all the files are created, the first thing we need to do is restore all packages from npm. To do this, we need to go to the action folder (not the root of the repository) and run the command:
And then a nuance arises. If you read the official documentation, in order for GitHub to download and execute the action correctly, all scripts, including dependencies, must be in the same repository. This means that we are essentially asked to commit the node_modules folder to the repository, which, in my opinion, is not a very nice solution.
Alternatively, you can use the @vercel/ncc package, which allows you to collect js or ts files into one single js file, which can already be committed to the repository.
Since we have already specified the build script in the package.json file, we only need to run the command:
[crayon-6a5e2d42e44fd177919600/]As a result, we will get the dist/index.js file, which will need to be committed to the repository along with the rest of the files. The node_modules folder can be safely sent to .gitignore.
Using the action
To test the action, let’s create a workflow file in the .github/workflows folder. For a change, we will make it so that it is launched not by push, but manually from the interface:
Here the workflow_dispatch settings describe the form in the GitHub interface into which the user can enter data. There we will have one single field for entering a name for the greeting.
The data entered into the form through the event is passed to the action, which we launch in the workflow through the github.event.inputs.Name parameter.
In addition, since the activity is in the same repository as the workflow, we definitely need to checkout so that all scripts are available in the working folder.
After we launch our workflow, we can go to the GitHub interface, on the Actions page, select our workflow and start its execution, specifying the parameters:
After we start the workflow, we can go into it and see what happened:
Configuring GitHooks for Automatic Builds
In general, everything is fine, we created an action using TypeScript and launched it from the workflow. This could have been done already, but one small detail remained.
Every time we change the action code, we need to remember to call the command:
[crayon-6a5e2d42e4505797477561/]From experience, such a manual launch will constantly lead to the situation “I sort of changed the code and pushed it to the server, but nothing has changed for me. Oh, damn it, I forgot to rebuild the files …”.
There are several ways to solve this problem. You don’t have to worry and really start the assembly with your hands every time. In some projects, people approach this thoroughly and do a special workflow through the same GitHub Actions, which for each commit tries to rebuild the action and commit changes.
But you can just add a git hook that automatically rebuilds all actions in the repository for each commit. To do this, you need to create a .githooks folder in the repository, and in it a pre-commit file of the following form:
Here we find all the action.yml files in the .github/actions folder and for all found files we run the build from their folder. Now we will not need to think about the explicit reassembly of our actions, it will be done automatically.
In order for the hooks from the .githooks folder to run, we need to change the configuration for the current repository:
Or you can do it globally:
[crayon-6a5e2d42e4521154496995/]Conclusion
This article has gathered the basic information you need to quickly take the first step to GitHub Actions and start writing your own automation scripts in TypeScript.
Each workflow consists of one or more jobs. In this case, the job is Hello. In general, jobs do not depend on each other and can be run in parallel on several machines, but if necessary, you can define dependencies between them.
Each job consists of a set of steps that are sequentially run inside one virtual machine. Each such step, in turn, can either execute an arbitrary command through run or can launch some action through uses.
The actions themselves are a separate piece of the workflow that can be reused across multiple projects. They can be of three kinds: docker container, JavaScript action, or compound actions (which are essentially just a reusable set of other actions). We’ll look at the JavaScript action option in this article, but we’ll write it in TypeScript for more convenience.
A few words about where to place actions in the repository
Actions can be placed in the repository in several places depending on your needs:
- In the
.github/actionssubfolder. This method is usually used when you want to use these actions from the same repository. In this case, you must refer to them along the path without specifying a branch or tag:
- Anywhere in the repository. For example, you can place multiple actions in the root of the repository, each in its own subfolder. This method works well if you want to create something like a personal library with a set of actions that you intend to use from different projects. In this case, you need to refer to such actions by the name of the repository, path and branch or tag:
- At the root of the repository. This method allows you to place only one activity in one repository, and is usually used if you want to publish it to the Marketplace later. In this case, you need to refer to such actions by the name of the repository and the branch or tag:
How to create a TypeScript action
As an example, let’s create a very simple action that simply displays the Hello, GitHub Actions! message. To develop an action, we need an installed version of Node.js.
Create a .github/actions folder in the repository. In it, we will create a subfolder hello, in which we will further create all the files related to our action. We only need to create four files.
Create action.yml file:
[crayon-6a5e2d42e44b7164981457/]This file contains the metadata of our action. By its presence, GitHub understands that the folder contains not a random set of files, but some action that can be downloaded and performed.
We also indicate that this is a JavaScript action, not a docker container, and we indicate the entry point: the dist/index.js file. We do not have this file yet, but it will be automatically created a little later.
In addition, we can specify in this file a set of input and output parameters. In this case, we pass the greeting name as a parameter.
(More information on the capabilities of the metadata file can be found in the documentation)
Create a package.json file:
[crayon-6a5e2d42e44ba615208565/]This is the standard file for Node.js. In order not to indicate useless attributes such as author, license, etc. you can simply indicate that the package is private.
In the scripts, we specify one single build script that runs the ncc utility. This utility takes the src/main.ts file as input and creates the dist/index.js file, which is the entry point for our action. I will come back to this utility a bit later.
As dependencies, we specify typescript and @types/node for TypeScript to work. The @vercel/ncc dependency is needed for ncc to work.
The @actions/* dependencies are optional and are part of the GitHub Actions Toolkit – a set of packages for developing actions:
You will most likely need the @actions/core dependency. It contains basic functionality for outputting logs, reading action parameters, etc.
The @actions/exec dependency is needed to start other processes like dotnet
The @actions/github dependency is needed to interact with the GitHub API
The @actions/glob dependency is needed to search for files by mask
It is also worth noting that formally since we will be compiling our action into a single dist/index.js file via ncc, all our dependencies will be design-time dependencies, i.e. it is more correct to place them not in dependencies, but in devDependencies. But by and large, there is no difference, these dependencies will not be used at all at runtime.
Create tsconfig.json file:
[crayon-6a5e2d42e44bd320721486/]Everything is quite simple here. This is a minimal file that everything works well with, including normal syntax highlighting and IntelliSense in Visual Studio Code.
Create src/main.ts file:
[crayon-6a5e2d42e44e2495627044/]As an entry point, we use a synchronous or asynchronous function main, which we call in the same file. (The function name can also be anything).
The body of the function must be wrapped in a try-catch block so that the build-in GitHub will abort in the event of any errors. Without this, it will always be considered successful.
In this particular case, we also use the @actions/core package to read the parameters and output the message to the log.
Putting together action with ncc
After all the files are created, the first thing we need to do is restore all packages from npm. To do this, we need to go to the action folder (not the root of the repository) and run the command:
And then a nuance arises. If you read the official documentation, in order for GitHub to download and execute the action correctly, all scripts, including dependencies, must be in the same repository. This means that we are essentially asked to commit the node_modules folder to the repository, which, in my opinion, is not a very nice solution.
Alternatively, you can use the @vercel/ncc package, which allows you to collect js or ts files into one single js file, which can already be committed to the repository.
Since we have already specified the build script in the package.json file, we only need to run the command:
[crayon-6a5e2d42e44fd177919600/]As a result, we will get the dist/index.js file, which will need to be committed to the repository along with the rest of the files. The node_modules folder can be safely sent to .gitignore.
Using the action
To test the action, let’s create a workflow file in the .github/workflows folder. For a change, we will make it so that it is launched not by push, but manually from the interface:
Here the workflow_dispatch settings describe the form in the GitHub interface into which the user can enter data. There we will have one single field for entering a name for the greeting.
The data entered into the form through the event is passed to the action, which we launch in the workflow through the github.event.inputs.Name parameter.
In addition, since the activity is in the same repository as the workflow, we definitely need to checkout so that all scripts are available in the working folder.
After we launch our workflow, we can go to the GitHub interface, on the Actions page, select our workflow and start its execution, specifying the parameters:
After we start the workflow, we can go into it and see what happened:
Configuring GitHooks for Automatic Builds
In general, everything is fine, we created an action using TypeScript and launched it from the workflow. This could have been done already, but one small detail remained.
Every time we change the action code, we need to remember to call the command:
[crayon-6a5e2d42e4505797477561/]From experience, such a manual launch will constantly lead to the situation “I sort of changed the code and pushed it to the server, but nothing has changed for me. Oh, damn it, I forgot to rebuild the files …”.
There are several ways to solve this problem. You don’t have to worry and really start the assembly with your hands every time. In some projects, people approach this thoroughly and do a special workflow through the same GitHub Actions, which for each commit tries to rebuild the action and commit changes.
But you can just add a git hook that automatically rebuilds all actions in the repository for each commit. To do this, you need to create a .githooks folder in the repository, and in it a pre-commit file of the following form:
Here we find all the action.yml files in the .github/actions folder and for all found files we run the build from their folder. Now we will not need to think about the explicit reassembly of our actions, it will be done automatically.
In order for the hooks from the .githooks folder to run, we need to change the configuration for the current repository:
Or you can do it globally:
[crayon-6a5e2d42e4521154496995/]Conclusion
This article has gathered the basic information you need to quickly take the first step to GitHub Actions and start writing your own automation scripts in TypeScript.
