A cloud for everyone. Building a CI/CD pipeline for serverless functions
In a public cloud built on Huawei technologies, there is an extremely useful serverless computing service – Function Graph. It allows you to quickly jot down code to solve a specific business problem and run it without wasting time deploying and configuring individual servers. But all this is great and very convenient as long as we are talking about just a couple of functions. And if there are already more than 5 such functions and they are actively developing, then it already looks like a project, and the project needs to be put under control and organized, albeit the simplest, but a process. And of course, the most important element of such a process will be the management of code within the framework of a version control system, for example, GitHub.
The fact is that Function Graph does not support any kind of integration with version control systems, and it is impossible to move from “knee” development to industrial development using built-in tools. However, as it turned out, such integration is not difficult to do on your own using the same Function Graph.
The possibilities of this integration and the scenario discussed below will be of interest to startups and independent developers. First, it does not require large budgets for deployment and the use of other cloud resources, the consumption of which will entail additional costs. Secondly, in the conditions of a small team, this process is easy to control and, having integrated GitHub manually once, use this tool throughout the life cycle of the entire project. We will show you how to do this in this article.
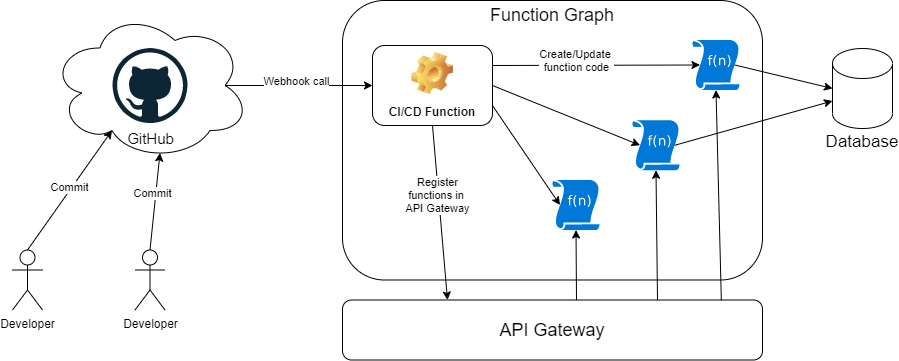
So, in order to integrate with GitHub, we will use the fact that it provides the ability to call an external webhook when an event occurs. In this case, I am interested in committing changes to the master branch. As an external webhook, we will make … of course a function on FunctionGraph, which will be called through the API Gateway. Further, this function will receive a list of new/changed files and create / update functions, taking the code from the repository files and publishing the code of these files through the cloud API. The process diagram is shown in the picture:
For automatic deployment of functions, you will need to define some general conventions. For example, Function Graph can combine functions into virtual “applications”, we will use the name of the repository in GitHub as the name of such an application. Further, when registering functions as a backend in API Gateway, you will need to give a name to each API, and then again, by default, we use the general template of the form API_ <file name> (example: the function code is in the “clients.js” file; when publishing, the API will receive API_clients_js name). All of these conventions are visible in the function code and can be changed at your discretion.
It will not be superfluous to mention that to simplify the deployment procedure, we will write the function code in scripting languages, in this case, in NodeJS, which do not require any preliminary compilation before publishing the code. We also assume that the functions themselves will act as “controllers” for logical entities and in the presented demo they will perform basic CRUD operations.
The action plan is as follows:
1. We create a function for the CI-CD process. You will need to create an IAM Agency to manage your cloud infrastructure
2. Preparing the environment for the project:
- Create an API group in API Gateway
- Get network identifiers
- We create an IAM Agency for access to a virtual network
- We generate dependencies, load the package, get the identifier
- We register the parameters as variables in the CI-CD function
3. We register the API Gateway trigger for the CI-CD function and get the link for the webhook.
4. Registering the webhook in the GitHub repository settings.
5. We create a project application.
Go.
Function for handling events from GitHub.
First, let’s create a function in the Function Graph that will act as a webhook to receive events from GitHub. Create a function, choosing Node.JS 12.13 as the runtime. Copy the function code below.
|
1 2 3 4 5 6 7 8 9 10 11 12 13 14 15 16 17 18 19 20 21 22 23 24 25 26 27 28 29 30 31 32 33 34 35 36 37 38 39 40 41 42 43 44 45 46 47 48 49 50 51 52 53 54 55 56 57 58 59 60 61 62 63 64 65 66 67 68 69 70 71 72 73 74 75 76 77 78 79 80 81 82 83 84 85 86 87 88 89 90 91 92 93 94 95 96 97 98 99 100 101 102 103 104 105 106 107 108 109 110 111 112 113 114 115 116 117 118 119 120 121 122 123 124 125 126 127 128 129 130 131 132 133 134 135 136 137 138 139 140 141 142 143 144 145 146 147 148 149 150 151 152 153 154 155 156 157 158 159 160 161 162 163 164 165 166 167 168 169 170 171 172 173 174 175 176 177 |
const https=require("https"); exports.handler = async (event, context) => { let eventBody = JSON.parse(Buffer.from(event.body, 'base64').toString('ascii')); //Getting the name of the dependency package const dependencyPackageID = context.getUserData("dependency_package"); let token = context.getToken(); let project_id = context.getProjectID(); //Getting the list of existing functions const getFunctionsParams = { host: "functiongraph.ru-moscow-1.hc.sbercloud.ru", method: "GET", path: "/v2/"+project_id+"/fgs/functions", headers: { "X-Auth-Token": token } } const function_list = JSON.parse(await httpRequest(getFunctionsParams)); //Getting the list of all APIs inside our project API group const getApisParams={ host: "apig.ru-moscow-1.hc.sbercloud.ru", method: "GET", path: "/v1.0/apigw/apis?group_id="+context.getUserData("api_group_id"), headers: { "Content-Type":"application/json", "X-Auth-Token": token } } let apisList = JSON.parse(await httpRequest(getApisParams)); //Getting all files - both added and modified and pushing the changes into the FG functions for (const filename of eventBody.head_commit.modified.concat(eventBody.head_commit.added)){ func_name = filename.replace(".js","_js"); const fileGetParams={ host: "raw.githubusercontent.com", method: "GET", port: 443, path: "/"+eventBody.repository.full_name+"/"+eventBody.after+'/'+filename, headers: {Accept: "application/vnd.github.v3+json", "user-agent":"function graph"} } let fileBody = await httpRequest(fileGetParams) let functionExists = function_list.functions.find(item =>{ return item.func_name == func_name }) let func_urn = functionExists ? functionExists.func_urn : undefined; let http_path = "/v2/"+project_id+"/fgs/functions" + (functionExists ? "/"+func_urn+"/code" :""); let http_method = functionExists ? "PUT": "POST"; const createFunctionParams = { host: "functiongraph.ru-moscow-1.hc.sbercloud.ru", method: http_method, path: http_path, headers: { "Content-Type":"application/json", "X-Auth-Token": token } } //Function connection parameters, must be provided as string inside the function creation object const userData = { dbhost: context.getUserData("dbhost"), dbuser: context.getUserData("dbuser"), dbpwd: context.getUserData("dbpwd"), databasename: context.getUserData("databasename") } const functionData = { func_name: func_name, package:eventBody.repository.name, code_type:"inline", code_filename: "index.js", handler:"index.handler", memory_size:256, runtime:"Node.js12.13", timeout: 30, depend_list: [dependencyPackageID], func_code : { file:Buffer.from(fileBody).toString('base64') }, xrole: context.getUserData("vpc_access_agency_name"), func_vpc:{ vpc_id: context.getUserData("vpc_id"), subnet_id: context.getUserData("subnet_id") }, user_data: JSON.stringify(userData) } let createResult = await httpRequest(createFunctionParams, JSON.stringify(functionData)); const funcInfo = JSON.parse(createResult) //Looking for a API for this function var existingAPI = apisList.apis.find(item=>{ return item.name=="API_"+func_name; }); if (!existingAPI) { //Registering function in API Gateway const createAPIRequest={ group_id: context.getUserData("api_group_id"), name: "API_"+func_name, type: 1, req_method: "ANY", //Allows any HTTP method so we can use this function as Controller req_uri: "/api/"+func_name, match_mode: "SWA", //We need Prefix match to be able to bypass URI with parameters to this function auth_type: "None", backend_type: "FUNCTION", func_info : { function_urn: funcInfo.func_urn, invocation_type: "sync", timeout: 30000 } } const createAPIParams={ host: "apig.ru-moscow-1.hc.sbercloud.ru", method: "POST", path: "/v1.0/apigw/apis", headers: { "Content-Type":"application/json", "X-Auth-Token": token } } const registerAPIResult=await httpRequest(createAPIParams, JSON.stringify(createAPIRequest)); const registeredAPI = JSON.parse(registerAPIResult); existingAPI = registeredAPI; } if (!existingAPI.publish_id) { const publishAPIRequest={ env_id: "DEFAULT_ENVIRONMENT_RELEASE_ID", remark: "published by GitHub webhook" } const publishAPIParams={ host: "apig.ru-moscow-1.hc.sbercloud.ru", method: "POST", path: '/v1.0/apigw/apis/publish/'+existingAPI.id, headers: { "Content-Type":"application/json", "X-Auth-Token": token } } const publishAPIResult = await httpRequest(publishAPIParams, JSON.stringify(publishAPIRequest)); } } console.log('Successfully deployed functions:'+eventBody.head_commit.modified.concat(eventBody.head_commit.added).join(', ')); const output = { 'statusCode': 200, 'headers': { 'Content-Type': 'text/plain' }, 'isBase64Encoded': false, 'body': 'OK' } return output; } //function to "promisify" http requests function httpRequest(params, postData) { return new Promise(function(resolve, reject) { try { var req = https.request(params, function(res) { var body = []; res.on('data', function(chunk) { body.push(chunk); }); // resolve on end res.on('end', function() { try { body = Buffer.concat(body).toString(); } catch(e) { reject(e); } resolve(body); }); }); // reject on request error req.on('error', function(err) { reject(err); }); if (postData) { req.write(postData); } req.end(); } catch(e){ console.log(e); reject(e); } }); } |
This feature needs some tweaking. First, you need to specify the IAM Agency, which has the rights to manage the cloud. In our case, such rights are needed for the Function Graph service itself, as well as for the API Gateway (in order to register our functions as a backend). To do this, open the IAM service and create an agency there with the necessary rights to access the Function Graph:
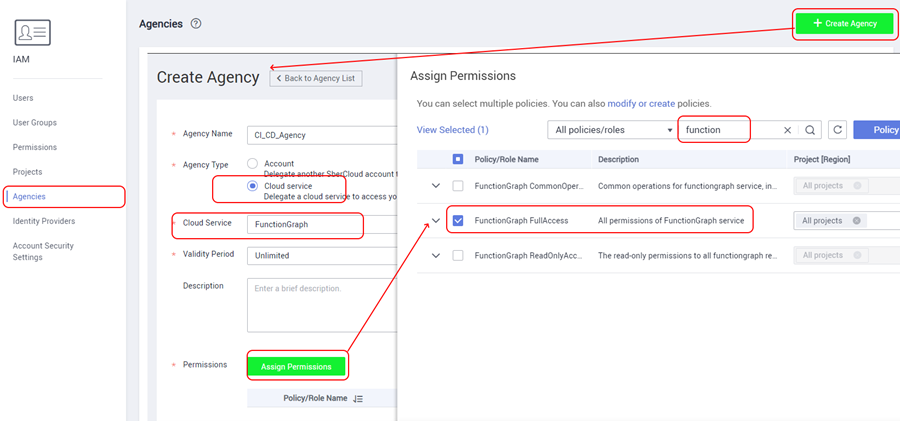
On the same page, we add another access right called APIG Administrator – it will be required in order to be able to automatically register new functions in the API Gateway.
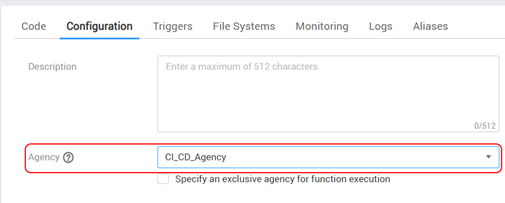
On the Configuration page of our function, you need to select this agency:
On the same configuration page, you need to set a number of parameters for the function that determine the conditions for deploying the project.
Preparing the environment for the project
When launching a project, you will need to decide at least the question of which virtual network it will work in, because the functions are unlikely to work on their own, they will need access to other services and databases. In addition, these functions need to be addressed. The functions themselves can be launched from the cloud console, but for them to be available via HTTP requests, the API Gateway service is required. We will continue collecting these settings.
Creating an API Group in API Gateway
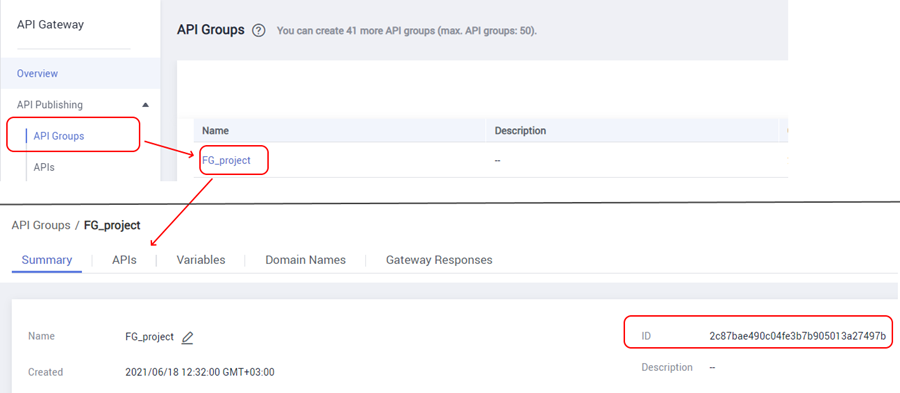
In order for the project code to be available from the outside, we need to register our functions as a backend in the API Gateway. In general, this is a standard pattern – you write the necessary backend, and your backend looks into the outside world through a “single window” in the form of a kind of unified API. The API Gateway service provides this Single Window. Therefore, the first thing that will be required is to create a team that will combine all functions into a single project and will provide a common entry point for all project functions.

After the group is created, you need to get its ID. How to find it is shown in the screenshot:
Retrieving Network IDs
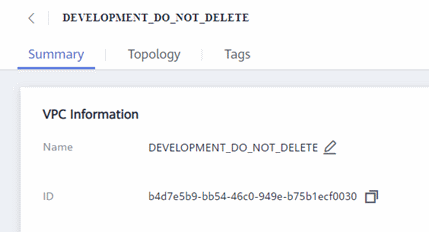
It’s much easier with networks. Open the Virtual Private Cloud section, click on the Virtual Private Cloud section:

select your network in the list and copy the ID in the network properties:
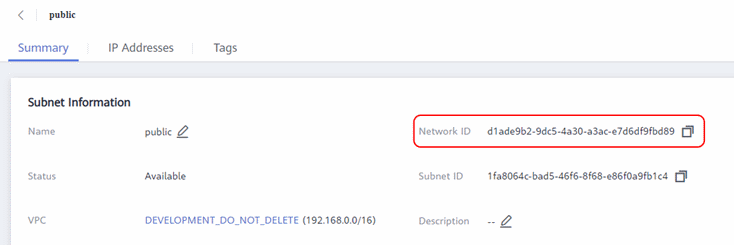
Now in the same place, on the left, select Subnets, find your subnet in which your function will work, and in the subnet properties copy the Network_id field. Important (!): It is the network_id that is needed, not the subnet_id:
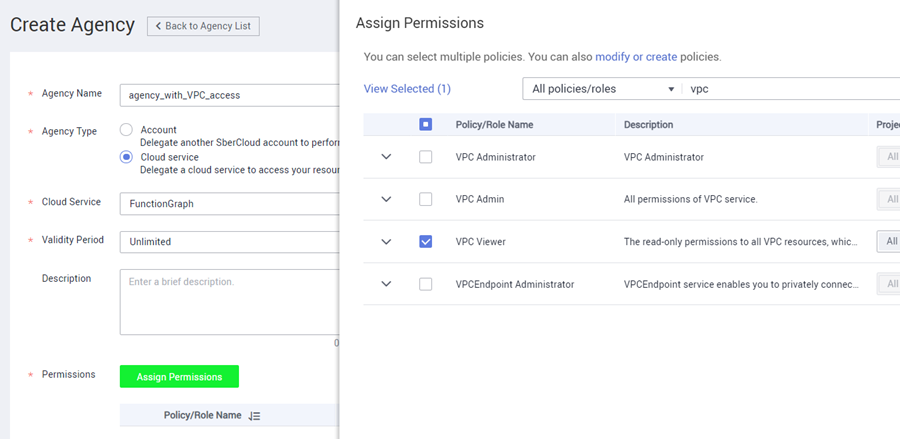
Creation of IAM Agency for virtual network access
For the function to be able to access other services in your virtual network, the parameters of the network itself are not enough. For the function, you need to specify the IAM Agency, which will have the right to access the network. To create an agency, go to Identification and Access Management (IAM), select Agencies, and create an agency. The setting is shown in the screenshot:
Generating dependencies, loading a package, getting an ID
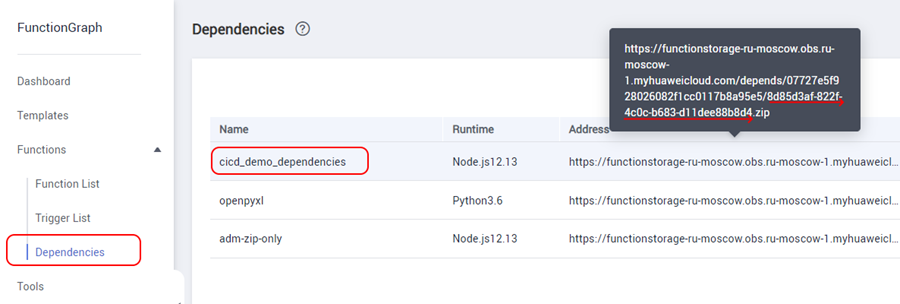
You can guarantee with a 100% probability that the built-in modules available in the function without connecting external packages will not be enough for you. In a regular project, you install dependencies through a package manager. In the case of the Function Graph function, all dependencies must be prepared before the first run of the function. The package preparation process is described in detail in the documentation.
After the package is prepared and uploaded to the appropriate section, you need to find its internal technical identifier. To do this, in the Dependencies section, hover over the Address field in the line with your package and copy the name of the zip file from this address (see screenshot):
Preparing CI-CD Function Parameters
Now you need to register all the values collected in the previous steps in the settings of the CI-CD function. To do this, open the function, go to the Configuration section and create 5 values in the Environment Variables block:
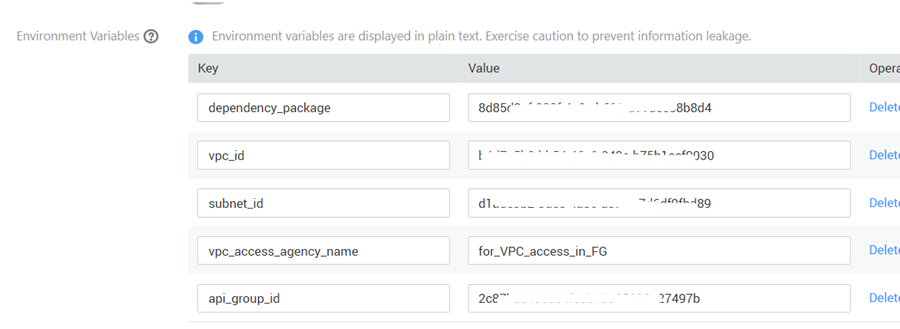
If the functions of your project require additional settings, for example, to access the database, it is logical to also enter them here and when deploying the code, specify these settings as well. In the presented code, this is done for the database access settings.
Registering an API Gateway trigger for a function and getting a link to call a webhook
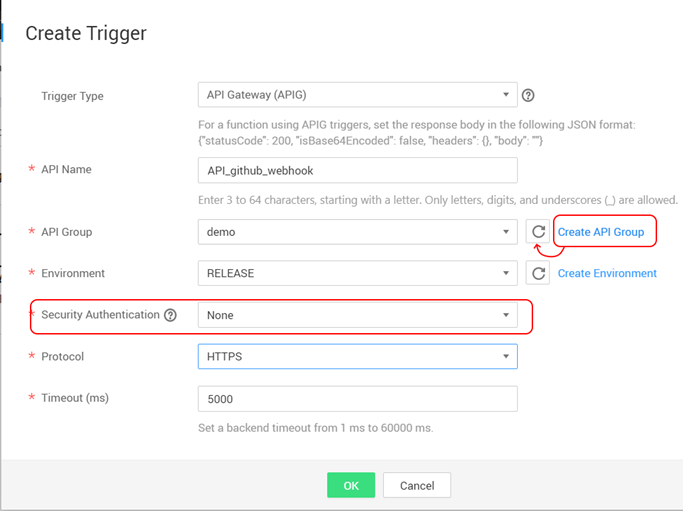
So, we finished with the project configuration and entered all the parameters into the settings of our CI / CD function. Now you need to assign a trigger, with which the function can be called using an HTTP request and used as a webhook. To do this, on the Triggers tab for the function, click Create Trigger, select the API Gateway trigger type. It is recommended to create a separate API Group so that the call address for the project does not overlap with the address for your webhook. Create a group, return to the trigger registration window and complete its creation according to the screenshot:
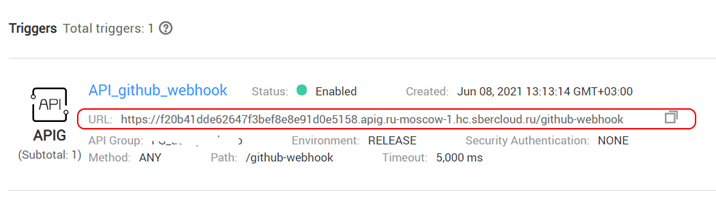
A plate will appear in the list of triggers, from which copy the URL – this will be the address of our webhook for registering with GitHub:
Setting up a webhook on a GitHub repository
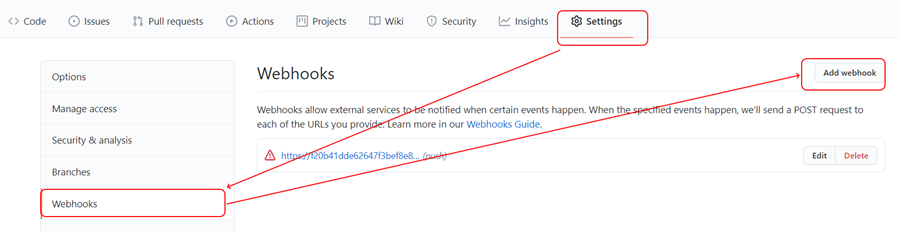
Setting up a webhook for a repository is very simple, open the repository settings, select the webhooks section and click the Add webhook button:
Preparing the project template
All preparation is done, it remains to write the code. For a quick start in the proposed scenario, a template has been prepared for such a function – a typical “controller” that can be used as a starting point for project development. The template is the simplest API for CRUD operations on data. For example, a database with a table of products was taken and the basic operations of creating / editing / deleting records were implemented. The function also needs database access settings, they are set from the configuration of the main CI / CD function.
|
1 2 3 4 5 6 7 8 9 10 11 12 13 14 15 16 17 18 19 20 21 22 23 24 25 26 27 28 29 30 31 32 33 34 35 36 37 38 39 40 41 42 43 44 45 46 47 48 49 50 51 52 53 54 55 56 57 58 59 60 61 62 63 64 65 66 67 68 69 70 71 72 73 74 75 76 77 78 79 80 81 82 83 84 85 86 87 88 89 90 91 92 93 94 95 96 97 98 99 100 101 102 103 104 105 106 107 108 109 110 111 112 113 114 115 116 117 118 119 120 121 122 123 124 125 126 127 128 129 130 131 132 133 134 135 136 137 138 139 140 141 142 143 144 145 146 147 148 149 150 151 152 153 |
//import section. Request your dependencies here let mysql = require('mysql'); //Main function, that receive events. exports.handler = async (event, context) => { /*Where to get information for controller HTTPMethod: event.httpMethod extra path: event.pathParameters[""]. For example, if your api is located at /api/function/ path and you are calling /api/function/details/123, then event.pathParameters[""] will contain "details/123" body: event.body, but it is base64 encoded. So to get body as object, use: const eventBody = JSON.parse(Buffer.from(event.body, 'base64').toString('ascii')) query: path.queryStringParameters. Example: /api/function?search=something, this object will look like: { search: "something" } */ const eventBody = event.body ? JSON.parse(Buffer.from(event.body, 'base64').toString('ascii')): {} var controllerOutput={ body: {}, contentType: "application/json" } /* Database connection preparation */ var connection = mysql.createConnection({ host : context.getUserData("dbhost"), user : context.getUserData("dbuser"), password : context.getUserData("dbpwd"), database : context.getUserData("databasename") }); connection.connect(); /* Typical CRUD controller: action depends on HTTP method */ switch (event.httpMethod) { case "GET": //GET could mean "Get list" and "Get One" if (event.pathParameters[""]) { //When pathParameters is not empty, then we have url like /api/products/{id} controllerOutput = await getProductDetails(connection, event.pathParameters[""]) } else { //When nothing in the path - we are looking for the list controllerOutput = await getProducts(connection, event.queryStringParameters.name); } break; case "POST": controllerOutput = await createProduct(connection, eventBody); break; case "PUT": controllerOutput = await updateProduct(connection, eventBody); break; case "DELETE": controllerOutput = await deleteProduct(connection, event.pathParameters[""]) break; default: controllerOutput = { body: "Unrecognized command", contentType: "text/plain" } } const output = { 'statusCode': controllerOutput.statusCode? controllerOutput.statusCode : 200, 'headers': { 'Content-Type': controllerOutput.contentType }, 'isBase64Encoded': false, 'body': (typeof controllerOutput.body)==='string' ? controllerOutput.body : JSON.stringify(controllerOutput.body) } return output; } async function getProducts(connection, searchForName) { var SQL = "select * from products "; if (searchForName) { SQL = SQL +" where name like ?"; searchForName=searchForName+'%'; } SQL = SQL + ' limit 100'; const products = await executeQuery(connection, SQL, [searchForName]); return { body: products, contentType: 'application/json' } } async function getProductDetails(connection, productId) { var SQL = "select * from products where ID=?"; const productData = await executeQuery(connection, SQL, [productId]); return { body: productData.length>=1? productData[0] : {}, contentType: 'application/json' } } async function createProduct(connection, product) { const SQL = "insert into Products (Name, Description, Price) values (?, ?, ?);"; const result = await executeQuery(connection, SQL, [product.name, product.description, product.price]); return { body: 'OK', statusCode: 201, contentType: 'text/plain' } } async function updateProduct(connection, product) { const SQL = "update Products set Name = ?, description = ?, price = ? where ID=?"; const result = await executeQuery(connection, SQL, [product.name, product.description, product.price, product.id]); return { body: 'OK', contentType: 'text/plain' } } async function deleteProduct(connection, productId) { const SQL = "delete from Products where ID=?"; const result = await executeQuery(connection, SQL, [productId]); return { body: 'OK', contentType: 'text/plain' } } //Special function to "promisify" query execution function executeQuery(connection, querySQL, queryParams){ return new Promise(function(resolve, reject) { try { connection.query(querySQL, queryParams, function (error, results, fields) { if (error) throw error; resolve(results); }); } catch (e){ reject(e); } }) } |
Conclusion
The article showed how you can organize and control the process of deploying a project based on serverless functions. This solution is the most economical option for small teams and startups, whose project is still at the stage of promotion, in conditions of limited budgets, roles, etc.
